> ## Documentation Index
> Fetch the complete documentation index at: https://docs.wherobots.com/llms.txt
> Use this file to discover all available pages before exploring further.
# AI-Assisted Notebook Development
> Create and connect local Jupyter notebooks to remote Wherobots compute with automatic kernel selection. Create, edit, and execute spatial notebooks using natural language prompts within your editor.
Public Preview
The Wherobots VS Code Extension provides Jupyter integration that connects your local notebooks
to remote Wherobots compute with automatic kernel selection, all within your editor.
1. Install the [Wherobots VS Code Extension](/develop/agentic-tools) and set your API key via `Wherobots: Set API Key` in the Command Palette.
2. Run `Wherobots: Create Workspace` from the Command Palette and click **Create & Start**.
3. Open **Chat** in **Agent** mode with a high-performance model (e.g. Gemini Pro, Claude Opus, or GPT Codex).
4. Warm up the MCP server by asking a simple question, e.g. *List the available tables in wherobots\_pro\_data.*
5. Prompt the AI assistant to build and run your notebook, e.g.:
> *Create a notebook that finds all parks within 1 mile of subway stations in Manhattan using Overture Maps. Run each cell.*
6. Allow the Wherobots MCP server if prompted.
The Wherobots MCP Server requires a [Professional, Innovation, or Enterprise](/get-started/organization-management/organization-editions) Organization Edition. Community Edition Organizations do not have access to the Wherobots MCP server.
## Benefits of AI-assisted notebook development
The steps below use GitHub Copilot Chat in VS Code. Other editors have an equivalent feature — Cursor (Chat / Composer), Windsurf (Cascade), Kiro (AI Chat), Positron (Copilot Chat), Trae (Side chat).
Consult your editor's documentation for details on accessing chat, switching modes, and selecting models.
AI-assisted notebook development with the Wherobots VS Code Extension and your editor's AI assistant offers several key benefits:
Generate code, data loading, and analysis steps with natural language prompts.
Work within your editor without needing to switch contexts between different tools for notebook development and Wherobots interaction.
Focus on analysis and insights while the AI assistant handles code generation and execution details.
Explore datasets and analysis techniques with AI guidance, making it easier to get started with new data or methods.
Leverage the Wherobots MCP server for dataset discovery and execution, unlocking the full potential of Wherobots Cloud in your notebooks and then turn those notebooks into repeatable workflows and jobs.
## Before you start
Ensure you have the following:
* The [Wherobots VS Code Extension](/develop/agentic-tools) installed and configured (also compatible with [Cursor](https://www.cursor.com/), [Windsurf](https://windsurf.com/), [Kiro](https://kiro.dev/), and [other editors](/develop/agentic-tools))
* A Wherobots **Account**. For more information, see [Create a Wherobots Account](/get-started/wherobots-cloud/create-account).
* **Community Edition Organizations** can run local notebooks against the Tiny and Micro runtimes.
* **Professional, Innovation, or Enterprise Organizations** are required for job submission, the Wherobots MCP server, and additional compute tiers. For more information, see [Upgrade Organization](/get-started/upgrade-organization) or [Organization Editions](/get-started/organization-management/organization-editions).
* An active **GitHub Copilot** subscription (or your editor's equivalent AI assistant). For more information about Copilot, see Microsoft's [GitHub Copilot](https://github.com/features/copilot).
**Use advanced models**
AI-assisted notebook generation works best with the latest advanced AI models (for example, the latest Claude Opus, Gemini Pro, or GPT Codex models) -- ensure your subscription includes access to these models for optimal results.
## Create and run a notebook with your AI assistant
To create and run a Jupyter notebook connected to Wherobots compute using your editor's AI assistant:
To open the **Command Palette**, click the search bar at the top of your editor and type `>wherobots:`.
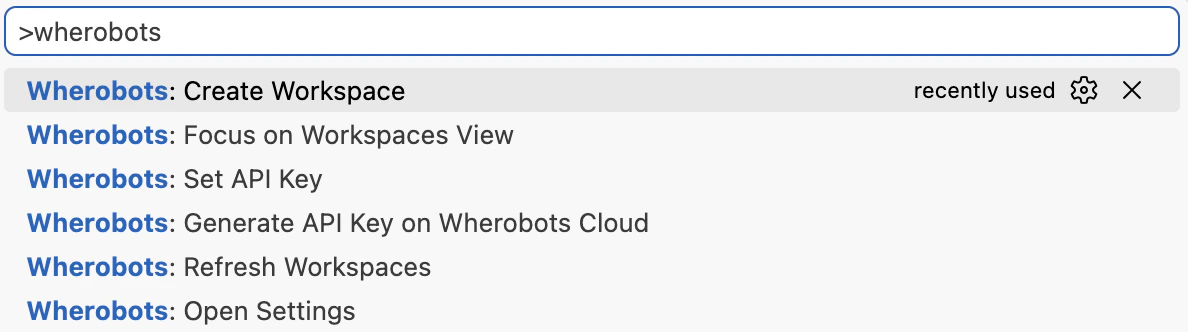 You can also press ⌘ + Shift + P on Mac, Ctrl + Shift + P on Windows/Linux.
If you haven't already, set up your API Key:
1. Type `Wherobots: Set API Key` and click Enter.
2. Enter your Wherobots API key when prompted.
If you haven't created an API key yet, run `Wherobots: Generate API Key on Wherobots Cloud` to create one.
Open the Command Palette and type `Wherobots: Create Workspace`.
Click Enter to run the command.
1. Choose the runtime configuration for your workspace, including **Region**, **Runtime Size**, and **Idle Timeout**.
2. Click **Create & Start**.
You can also press ⌘ + Shift + P on Mac, Ctrl + Shift + P on Windows/Linux.
If you haven't already, set up your API Key:
1. Type `Wherobots: Set API Key` and click Enter.
2. Enter your Wherobots API key when prompted.
If you haven't created an API key yet, run `Wherobots: Generate API Key on Wherobots Cloud` to create one.
Open the Command Palette and type `Wherobots: Create Workspace`.
Click Enter to run the command.
1. Choose the runtime configuration for your workspace, including **Region**, **Runtime Size**, and **Idle Timeout**.
2. Click **Create & Start**.
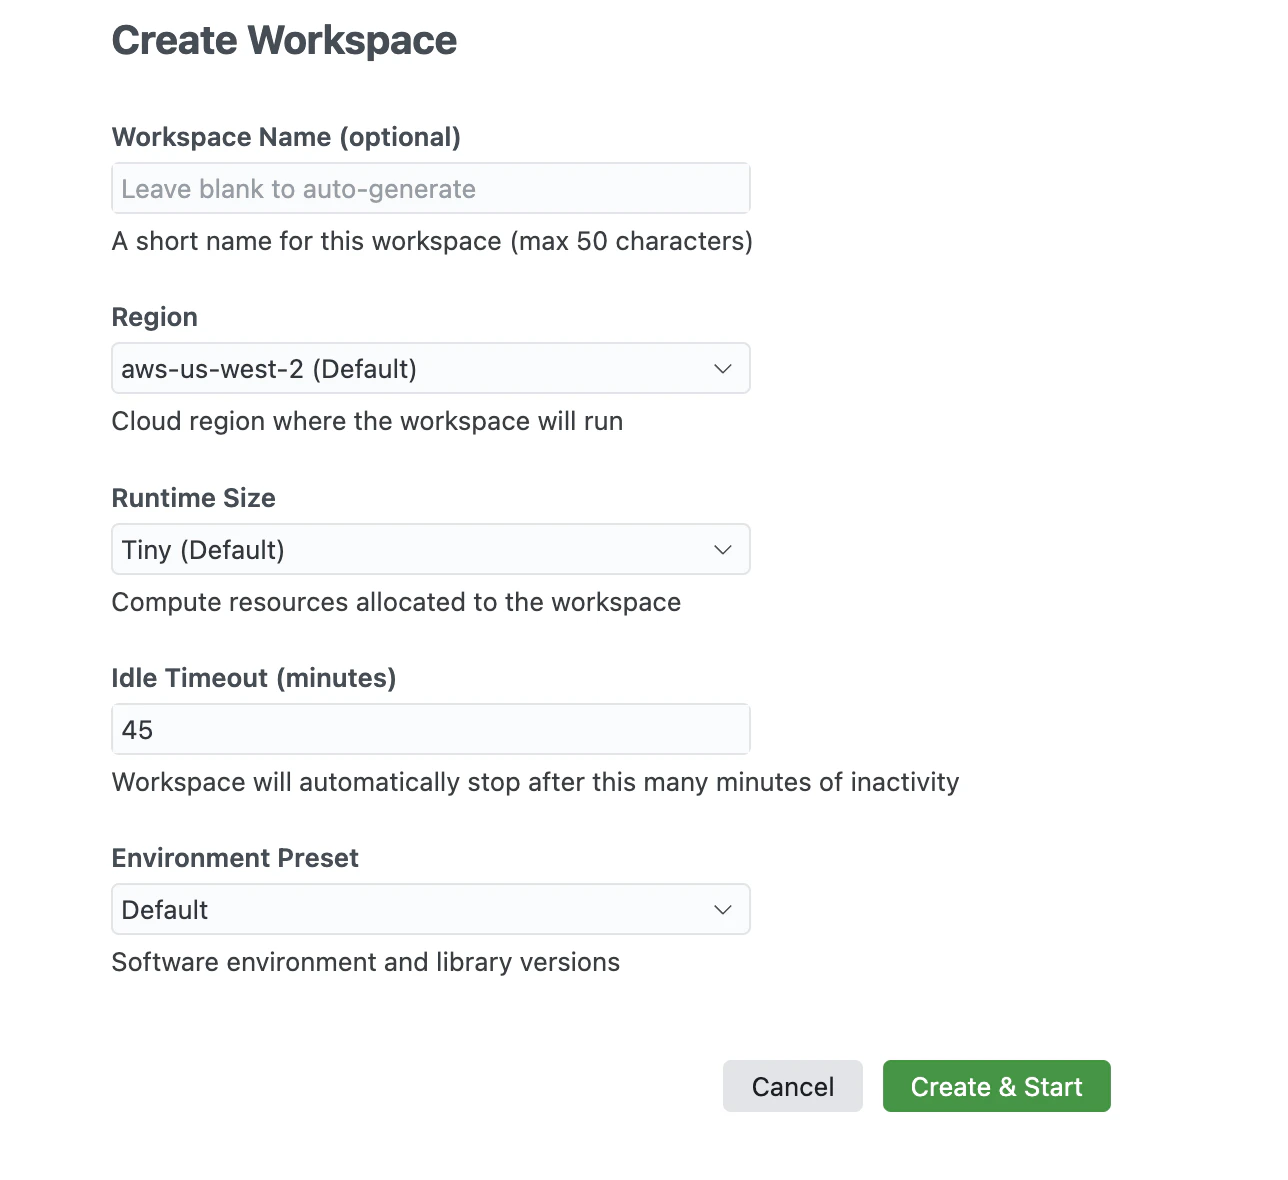 Community Edition Organizations are limited to the [Tiny and Micro runtimes](/develop/runtimes). Professional, Innovation, and Enterprise Organizations can select from [additional compute tiers](/develop/runtimes#runtime-specifications-chart).
Open your editor's AI assistant. In VS Code, open **GitHub Copilot Chat** via **View > Chat**.
In VS Code, you can also open Copilot Chat by pressing ⌘ + Shift + I on macOS or Ctrl + Shift + I on Windows/Linux. Other editors have their own shortcuts -- consult your editor's documentation.
Select **Agent** mode from the chat mode dropdown at the top of the chat panel.
Community Edition Organizations are limited to the [Tiny and Micro runtimes](/develop/runtimes). Professional, Innovation, and Enterprise Organizations can select from [additional compute tiers](/develop/runtimes#runtime-specifications-chart).
Open your editor's AI assistant. In VS Code, open **GitHub Copilot Chat** via **View > Chat**.
In VS Code, you can also open Copilot Chat by pressing ⌘ + Shift + I on macOS or Ctrl + Shift + I on Windows/Linux. Other editors have their own shortcuts -- consult your editor's documentation.
Select **Agent** mode from the chat mode dropdown at the top of the chat panel.
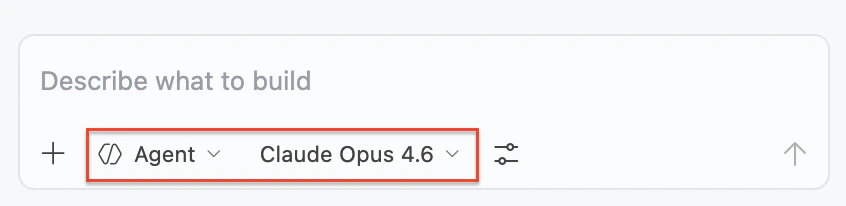 Select a high-performance AI model for optimal results. This includes the latest versions of advanced models such as **Gemini Pro**, **Claude Opus**, **Claude Sonnet**, or **GPT Codex**.
Ask a simple question to confirm the MCP server is connected:
> *List the available tables in wherobots\_pro\_data.*
The MCP server may take a moment to warm up if this is your first query since starting the workspace.
Shortly, you should see a response listing available tables in the `wherobots_pro_data` dataset.
The Wherobots MCP Server requires a [Professional, Innovation, or Enterprise](/get-started/organization-management/organization-editions) Organization Edition. Community Edition Organizations do not have access to the Wherobots MCP server.
Enter a natural language prompt describing the notebook you want. For example:
> *Create a notebook that finds all parks within 1 mile of subway stations in Manhattan using the Overture Maps dataset. Run each cell.*
When your editor requests permissions for the Wherobots MCP server, click **Allow** (or **Allow in this session** to avoid repeated prompts).
At this point, the AI assistant will locally generate a notebook (an `.ipynb` file) based on your prompt. You can [open and run this notebook](#run-a-local-notebook-against-wherobots-compute) in your editor.
## Run a local notebook against Wherobots compute
Now that your notebook is generated from the [previous step](#create-and-run-a-notebook-with-your-ai-assistant), you can run it and see the results of each cell directly within your editor.
You can use these steps to run **any** local Jupyter notebook against Wherobots compute, not just AI-generated notebooks.
This allows you to leverage Wherobots compute and datasets in your existing notebooks as well.
To open the **Command Palette**, click the search bar at the top of your editor and type `>wherobots:`.
You can also press ⌘ + Shift + P on Mac, Ctrl + Shift + P on Windows/Linux.
Click `Wherobots: Focus on Workspaces View`.
Click **Create Workspace**
Select a high-performance AI model for optimal results. This includes the latest versions of advanced models such as **Gemini Pro**, **Claude Opus**, **Claude Sonnet**, or **GPT Codex**.
Ask a simple question to confirm the MCP server is connected:
> *List the available tables in wherobots\_pro\_data.*
The MCP server may take a moment to warm up if this is your first query since starting the workspace.
Shortly, you should see a response listing available tables in the `wherobots_pro_data` dataset.
The Wherobots MCP Server requires a [Professional, Innovation, or Enterprise](/get-started/organization-management/organization-editions) Organization Edition. Community Edition Organizations do not have access to the Wherobots MCP server.
Enter a natural language prompt describing the notebook you want. For example:
> *Create a notebook that finds all parks within 1 mile of subway stations in Manhattan using the Overture Maps dataset. Run each cell.*
When your editor requests permissions for the Wherobots MCP server, click **Allow** (or **Allow in this session** to avoid repeated prompts).
At this point, the AI assistant will locally generate a notebook (an `.ipynb` file) based on your prompt. You can [open and run this notebook](#run-a-local-notebook-against-wherobots-compute) in your editor.
## Run a local notebook against Wherobots compute
Now that your notebook is generated from the [previous step](#create-and-run-a-notebook-with-your-ai-assistant), you can run it and see the results of each cell directly within your editor.
You can use these steps to run **any** local Jupyter notebook against Wherobots compute, not just AI-generated notebooks.
This allows you to leverage Wherobots compute and datasets in your existing notebooks as well.
To open the **Command Palette**, click the search bar at the top of your editor and type `>wherobots:`.
You can also press ⌘ + Shift + P on Mac, Ctrl + Shift + P on Windows/Linux.
Click `Wherobots: Focus on Workspaces View`.
Click **Create Workspace**
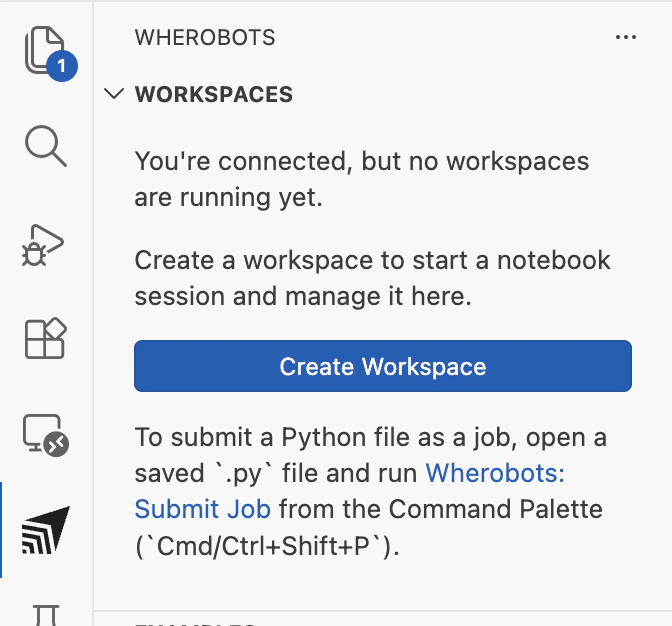 Creating a workspace provisions a [runtime](/develop/runtimes) -- a dedicated compute cluster -- in Wherobots Cloud. Once the runtime is running, your local notebook can connect to it and execute code remotely.
If the notebook is already open in your editor, skip to the next step.
Otherwise, do the following:
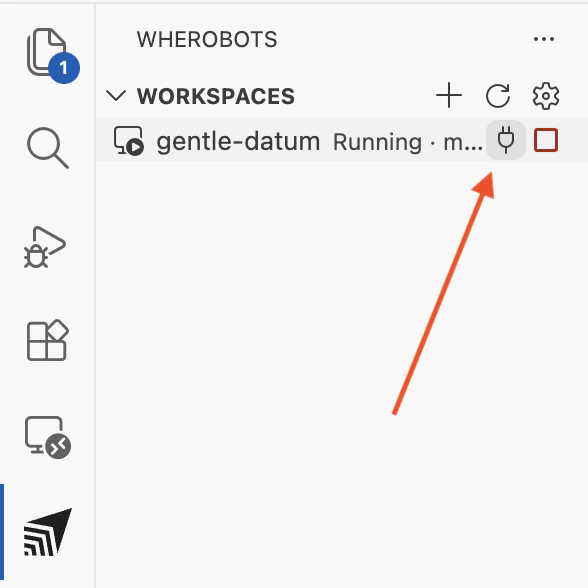
1. Hover over the running workspace you started and a plug icon () will appear.
2. Click the plug icon to find and open the notebook file on your local machine. The notebook will open in a new tab in your editor.
Creating a workspace provisions a [runtime](/develop/runtimes) -- a dedicated compute cluster -- in Wherobots Cloud. Once the runtime is running, your local notebook can connect to it and execute code remotely.
If the notebook is already open in your editor, skip to the next step.
Otherwise, do the following:
1. Hover over the running workspace you started and a plug icon () will appear.
2. Click the plug icon to find and open the notebook file on your local machine. The notebook will open in a new tab in your editor.
 Within the notebook, click **Run All** to execute all cells.
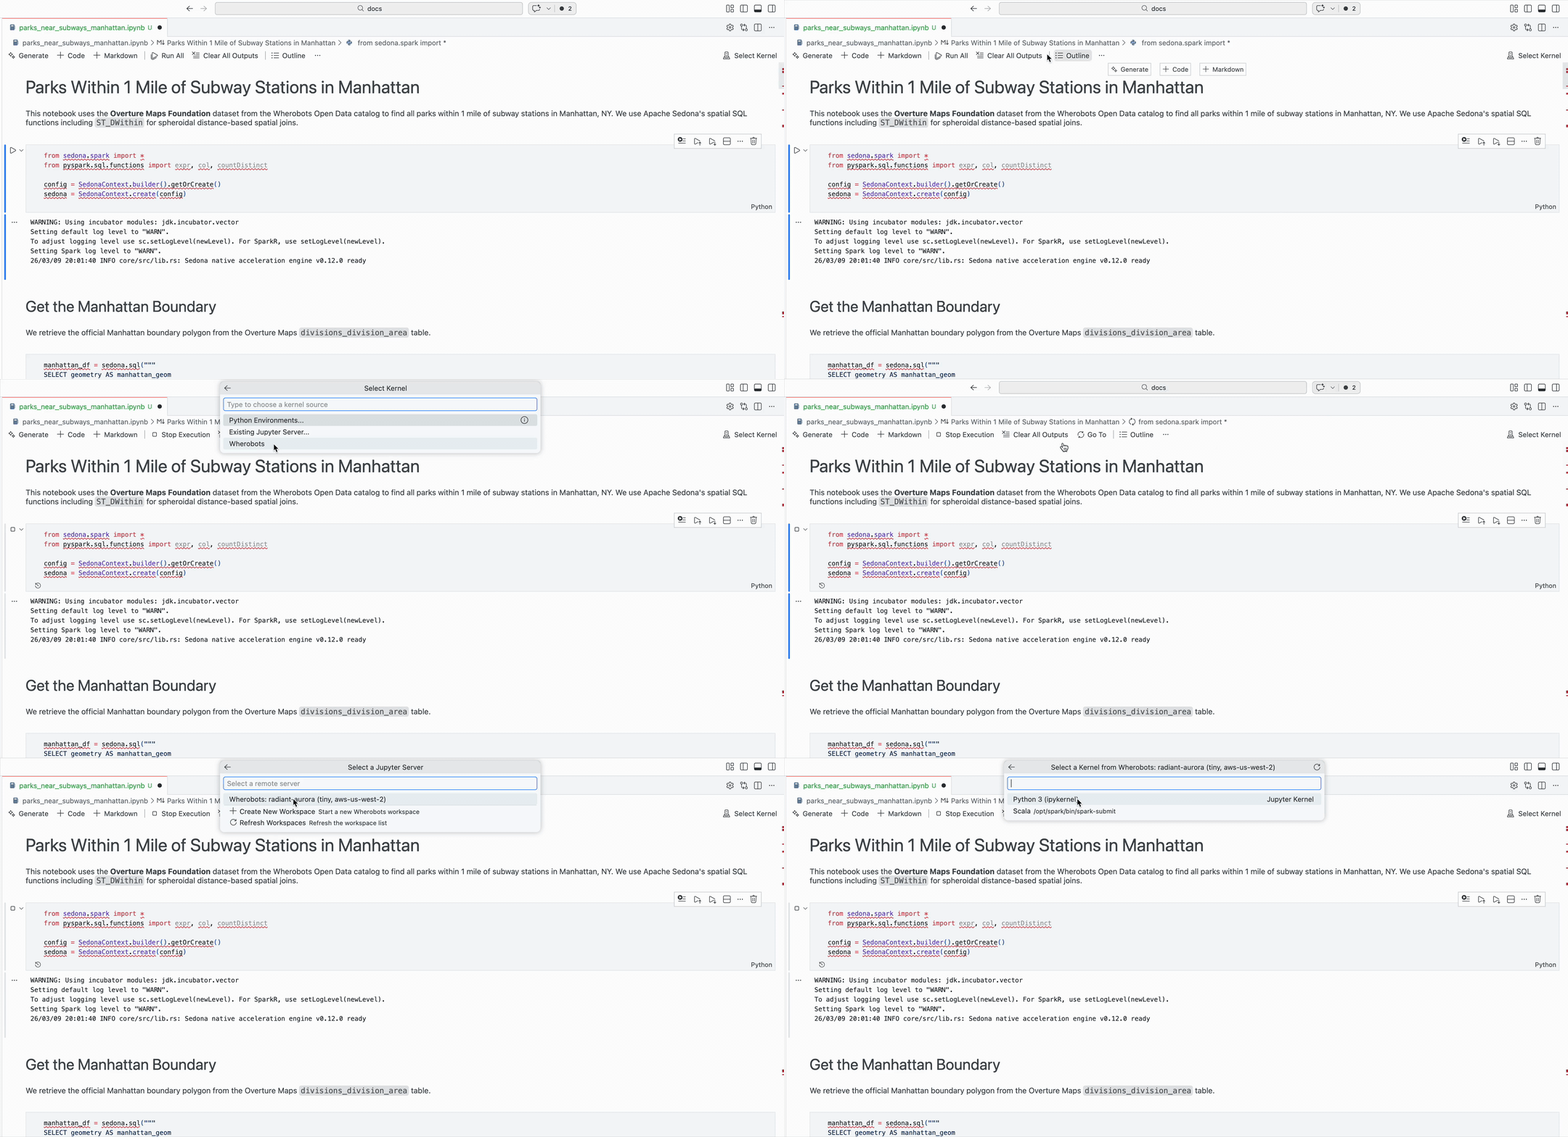 When prompted for the kernel source, select **Wherobots**.
Select a running workspace from the list. Each workspace corresponds to a runtime provisioned in Wherobots Cloud.
Select the appropriate Jupyter kernel. For most workflows, choose **Python 3 (ipykernel)**.
## Effective prompting strategies
The quality of AI-generated notebooks depends heavily on the prompts you provide. Use the following strategies for best results:
| Strategy | Example prompt |
| ----------------------------- | ------------------------------------------------------------------------------- |
| Be specific about the dataset | "Use the Overture Maps buildings dataset to find all hospitals in Chicago" |
| Request validation | "Check that each query works at a small scale before adding it to the notebook" |
| Request iteration on failures | "If a query fails, debug and fix it, then try again" |
| Specify output format | "Display the results on a map" |
AI-assisted development is meant to be iterative. You may need to refine your prompts or guide the AI assistant
through multi-step analyses. The experience improves as you develop prompting patterns
that work well with your datasets.
### Model selection tips
Use advanced AI models like the latest versions of the following for optimal results with AI-assisted notebook development:
* **Claude Sonnet**
* **Claude Opus**
* **Gemini Pro**
* **GPT Codex**
These models have enhanced reasoning capabilities and better contextual understanding, making them more effective at generating accurate code and handling complex notebook creation tasks.
## Next steps
Browse catalogs, schemas, and tables in the Data Hub sidebar. Create notebooks from your data with AI.
Submit Python scripts as Wherobots job runs. *Available to Professional, Innovation, and Enterprise Organizations only.*
Create, start, stop, and destroy notebook workspaces.
When prompted for the kernel source, select **Wherobots**.
Select a running workspace from the list. Each workspace corresponds to a runtime provisioned in Wherobots Cloud.
Select the appropriate Jupyter kernel. For most workflows, choose **Python 3 (ipykernel)**.
## Effective prompting strategies
The quality of AI-generated notebooks depends heavily on the prompts you provide. Use the following strategies for best results:
| Strategy | Example prompt |
| ----------------------------- | ------------------------------------------------------------------------------- |
| Be specific about the dataset | "Use the Overture Maps buildings dataset to find all hospitals in Chicago" |
| Request validation | "Check that each query works at a small scale before adding it to the notebook" |
| Request iteration on failures | "If a query fails, debug and fix it, then try again" |
| Specify output format | "Display the results on a map" |
AI-assisted development is meant to be iterative. You may need to refine your prompts or guide the AI assistant
through multi-step analyses. The experience improves as you develop prompting patterns
that work well with your datasets.
### Model selection tips
Use advanced AI models like the latest versions of the following for optimal results with AI-assisted notebook development:
* **Claude Sonnet**
* **Claude Opus**
* **Gemini Pro**
* **GPT Codex**
These models have enhanced reasoning capabilities and better contextual understanding, making them more effective at generating accurate code and handling complex notebook creation tasks.
## Next steps
Browse catalogs, schemas, and tables in the Data Hub sidebar. Create notebooks from your data with AI.
Submit Python scripts as Wherobots job runs. *Available to Professional, Innovation, and Enterprise Organizations only.*
Create, start, stop, and destroy notebook workspaces.