> ## Documentation Index
> Fetch the complete documentation index at: https://docs.wherobots.com/llms.txt
> Use this file to discover all available pages before exploring further.
# Jupyter Notebook Management
> Work with JupyterLab in Wherobots Cloud, including executing notebooks, importing custom Python modules, monitoring Spark jobs, and exporting notebooks for job submission.
After starting a notebook instance, Wherobots Cloud opens a pre-configured JupyterLab environment where you can write and execute spatial queries, visualize geospatial data, and build analytics workflows.
For information on starting a runtime and creating a notebook instance, see [Notebook Instance Management](/develop/notebook-management/notebook-instance-management).
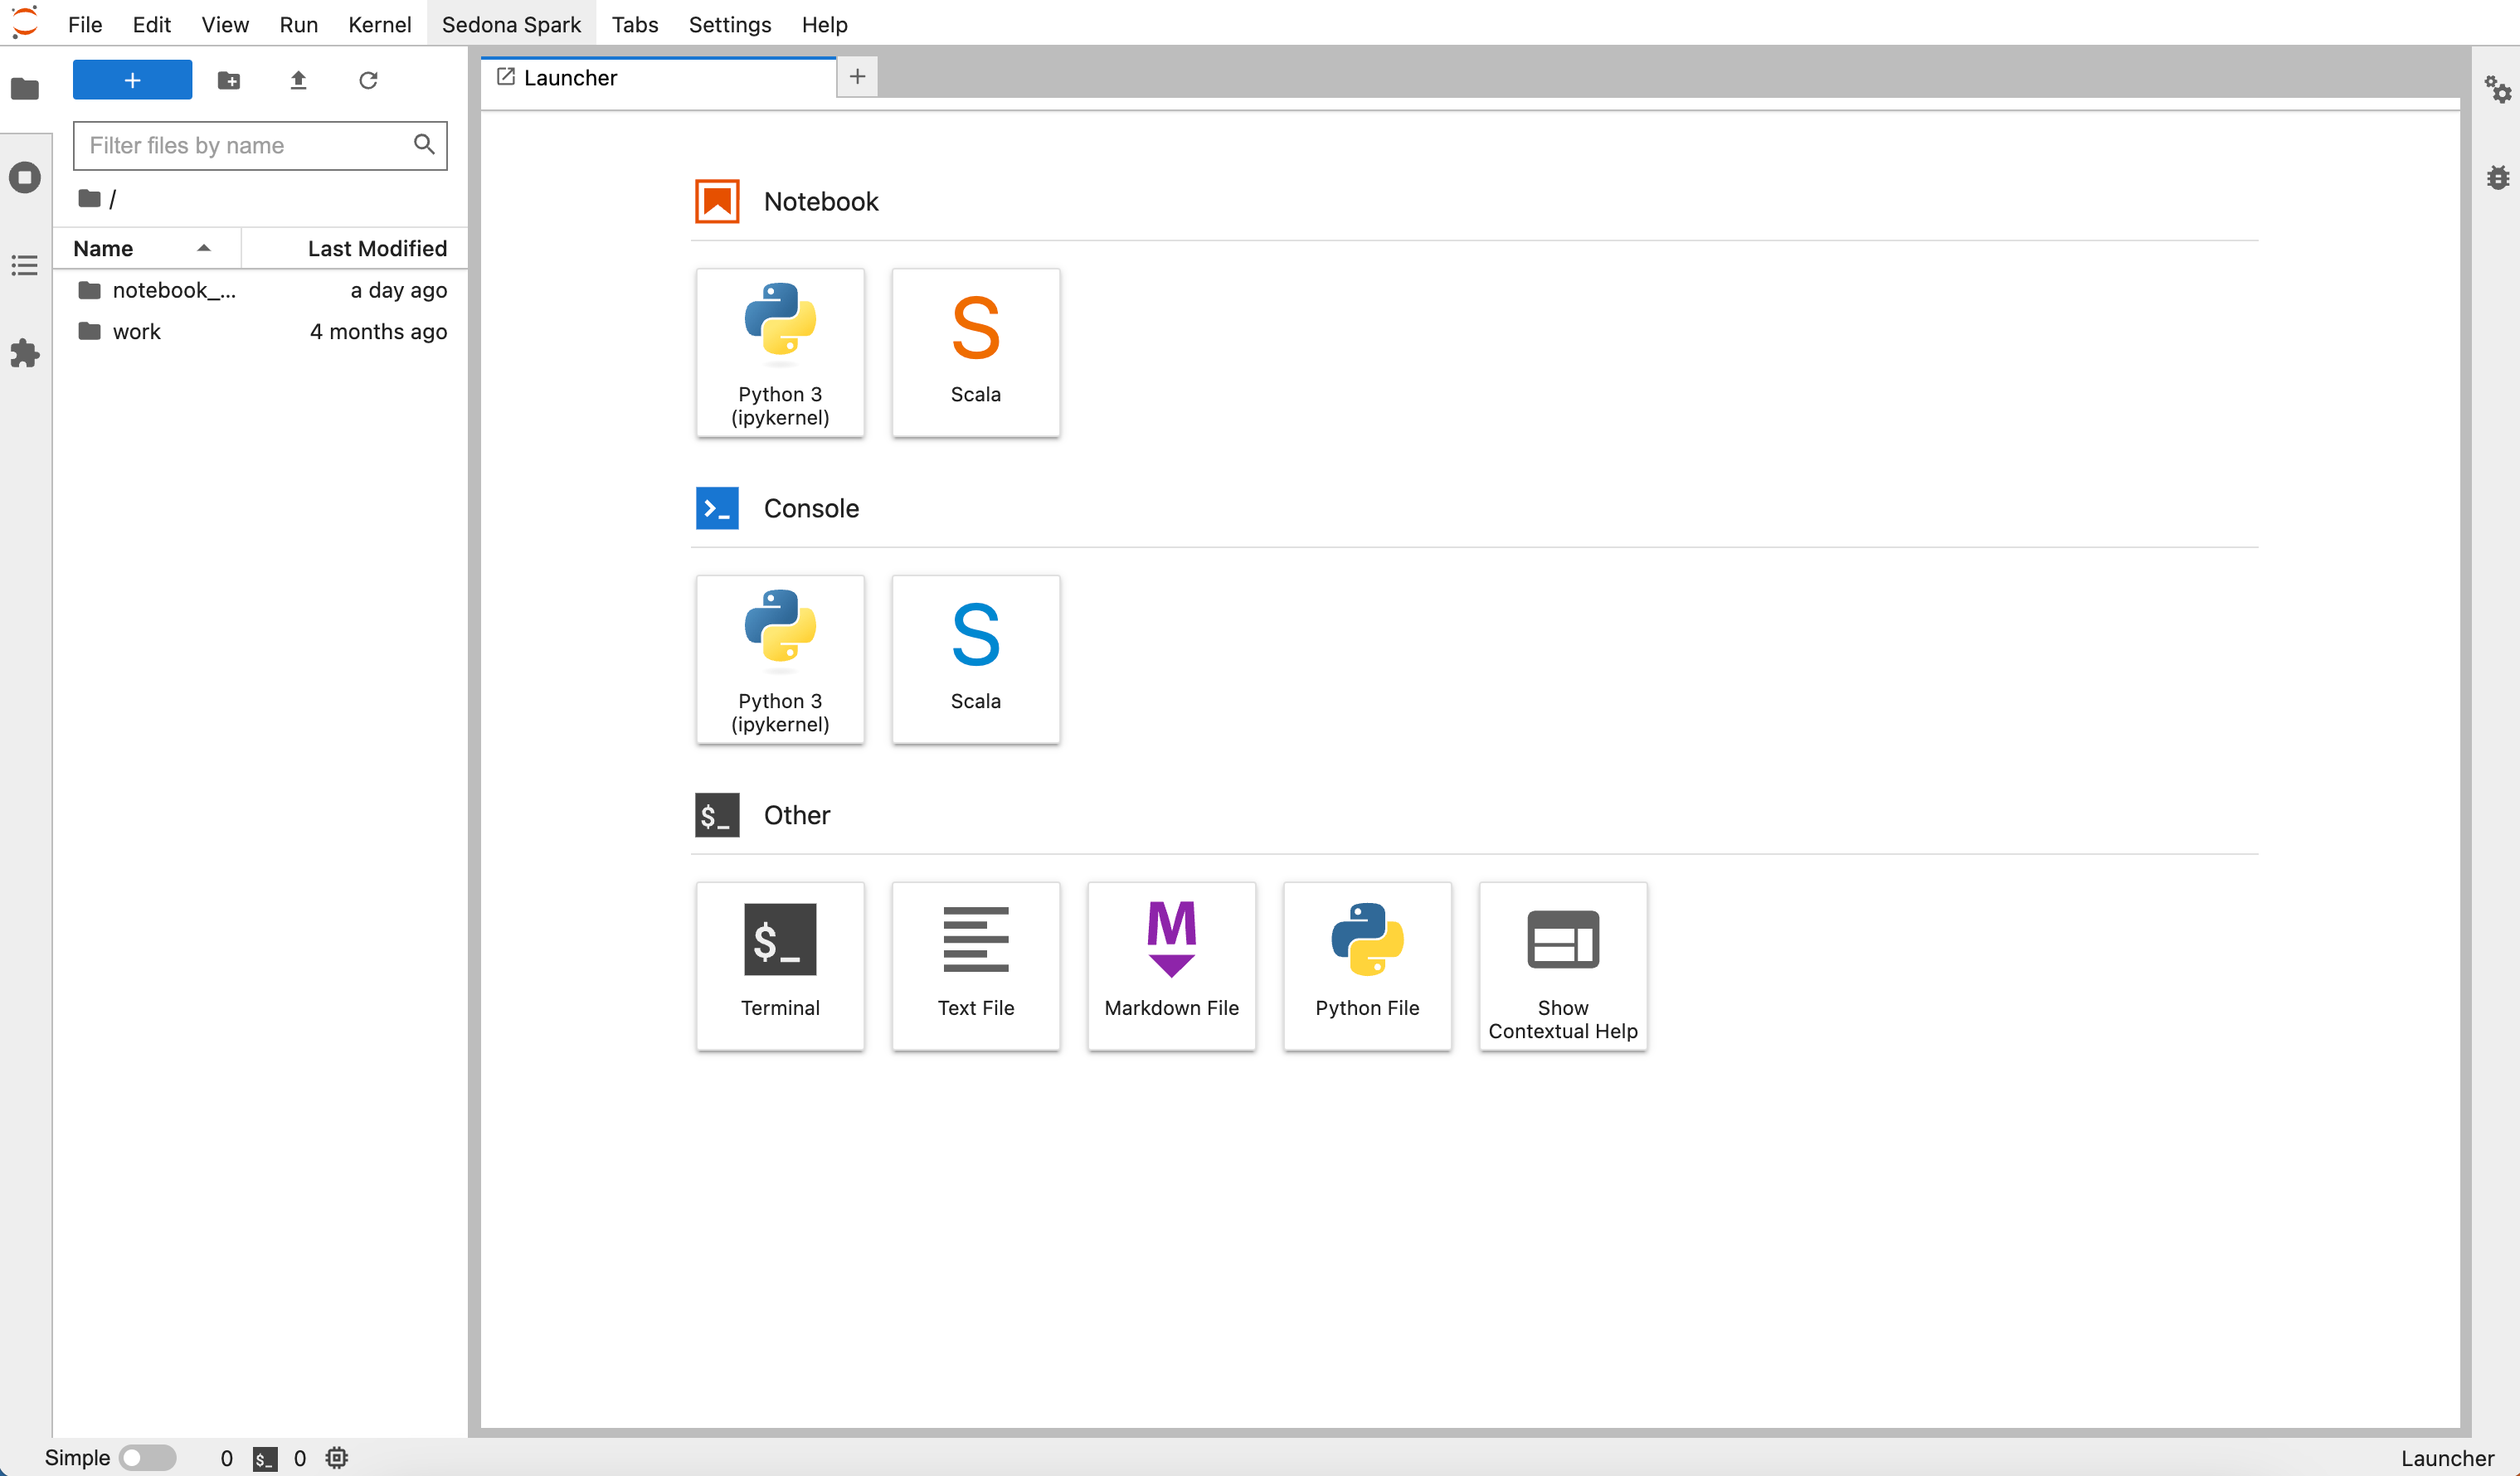
The introductory notebook appears when you first open a Wherobots Cloud Notebook. After that, you will see the JupyterLab **Launcher**.
 ## Before you start
The following is required to manage a Wherobots Notebook:
* An account within a Community, Professional, Innovation, or Enterprise Edition Organization. For more information, see [Create an Account](/get-started/wherobots-cloud/create-account).
## Available kernels
Wherobots Cloud provides two kernels for your Jupyter Notebooks:
* **Python kernel (ipykernel)** -- for Python-based spatial workflows using Apache Sedona and WherobotsDB.
* **Scala kernel (Scala)** -- for Scala-based spatial workflows.
To create a new notebook with either kernel, click **File > New Launcher** in JupyterLab and select the kernel.
## Execute notebook cells
### Run all cells
To execute all code cells in a notebook, do the following:
1. Click **Run** in the JupyterLab toolbar.
2. Click **Run All Cells**.
## Before you start
The following is required to manage a Wherobots Notebook:
* An account within a Community, Professional, Innovation, or Enterprise Edition Organization. For more information, see [Create an Account](/get-started/wherobots-cloud/create-account).
## Available kernels
Wherobots Cloud provides two kernels for your Jupyter Notebooks:
* **Python kernel (ipykernel)** -- for Python-based spatial workflows using Apache Sedona and WherobotsDB.
* **Scala kernel (Scala)** -- for Scala-based spatial workflows.
To create a new notebook with either kernel, click **File > New Launcher** in JupyterLab and select the kernel.
## Execute notebook cells
### Run all cells
To execute all code cells in a notebook, do the following:
1. Click **Run** in the JupyterLab toolbar.
2. Click **Run All Cells**.
 When you first execute a WherobotsDB code cell, you may see the following warning:
```
WARN TaskSchedulerImpl: Initial job has not accepted any resources;
check your cluster UI to ensure that workers are registered and have sufficient resources
```
This is expected behavior. Executors take 1-5 minutes to start depending on the runtime size.
### Monitor jobs with the Spark Web UI
The Spark Web UI helps you monitor running jobs, analyze query performance, and identify bottlenecks. To access it, click **Sedona Spark** in JupyterLab and select the correct port number.
When you first execute a WherobotsDB code cell, you may see the following warning:
```
WARN TaskSchedulerImpl: Initial job has not accepted any resources;
check your cluster UI to ensure that workers are registered and have sufficient resources
```
This is expected behavior. Executors take 1-5 minutes to start depending on the runtime size.
### Monitor jobs with the Spark Web UI
The Spark Web UI helps you monitor running jobs, analyze query performance, and identify bottlenecks. To access it, click **Sedona Spark** in JupyterLab and select the correct port number.
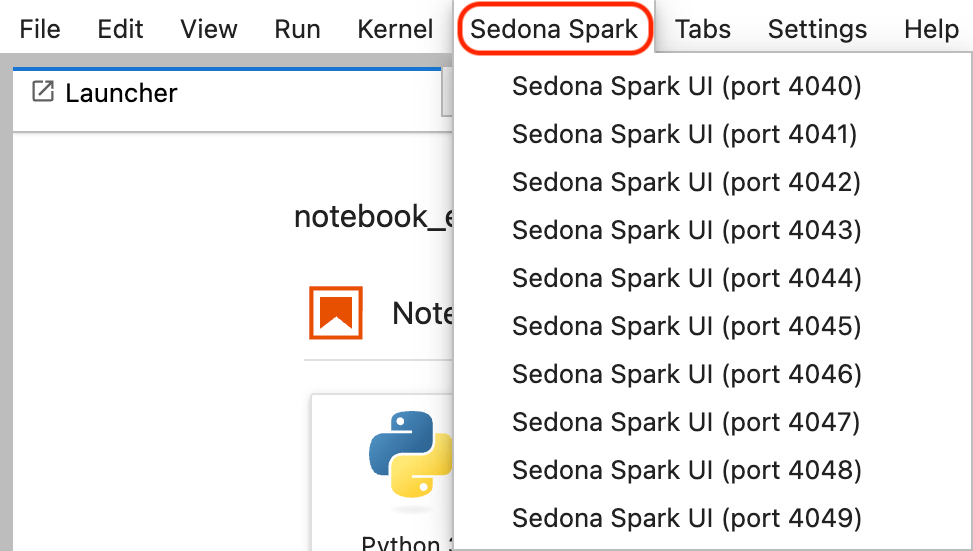 To retrieve the port number programmatically, run the following in a notebook cell:
```python theme={"system"}
# Get the Spark Web UI port number
spark_ui_port = sedona.sparkContext.uiWebUrl.split(":")[-1]
print(spark_ui_port)
```
For more information, see [Web UI](https://spark.apache.org/docs/latest/web-ui.html) in the Apache Spark documentation.
## Import custom Python modules
You can package custom Python modules as a zip file and import them into your notebook. This is useful for reusing shared utility functions across notebooks and job submissions.
### Create and upload a module
1. On your local machine, create a directory for your module:
```shell theme={"system"}
mkdir zipmoduletest
```
2. Create a Python file with your module code. For example, create `zipmoduletest/hellosedona.py`:
```python theme={"system"}
def hello(input):
return 'hello ' + str(input)
```
3. Add an empty `__init__.py` file to make the directory a valid Python package:
```shell theme={"system"}
touch zipmoduletest/__init__.py
```
4. Verify the directory structure:
```shell theme={"system"}
ls zipmoduletest
```
The output should show:
```
__init__.py hellosedona.py
```
5. Zip the module files:
```shell theme={"system"}
cd zipmoduletest && zip -r9 ../zipmoduletest.zip *
```
6. Upload `zipmoduletest.zip` to Wherobots Managed Storage or your integrated Amazon S3 bucket. For more information, see [Notebook and Data Storage](../storage-management/storage).
### Use the module in a notebook
After uploading, add the zip file to the Spark context and import your module:
```python theme={"system"}
# Add the zip file to the Spark context
sedona.sparkContext.addPyFile('s3:///path-to-file/zipmoduletest.zip')
# Import and use the custom module
from zipmoduletest.hellosedona import hello
result = hello("Sedona")
print(result)
```
Output:
```
hello Sedona
```
You can also use `addPyFile` to import custom Python modules in job submissions, not just notebooks.
## Access data from Amazon S3
For information on reading and writing data from an integrated Amazon S3 bucket, see [Access Integrated Storage in a Notebook](../storage-management/s3-storage-integration#access-integrated-storage-in-a-notebook).
To use new storage integrations or catalogs in your notebooks, you must start a new runtime. Notebooks can only access storage integrations or catalogs that were created before the runtime started.
## Open a notebook by path
To open a specific notebook file, do the following:
1. Click **File > Open from path**.
2. Enter the notebook path.
3. Click **Open**.
## Export notebooks
You can export notebooks as executable scripts for use with [WherobotsRunOperator](../run-operator) job submissions.
### Export a Python notebook
To export a Python notebook as an executable script, do the following:
1. Click **File** in the JupyterLab toolbar.
2. Hover over **Save and Export Notebook As...**
To retrieve the port number programmatically, run the following in a notebook cell:
```python theme={"system"}
# Get the Spark Web UI port number
spark_ui_port = sedona.sparkContext.uiWebUrl.split(":")[-1]
print(spark_ui_port)
```
For more information, see [Web UI](https://spark.apache.org/docs/latest/web-ui.html) in the Apache Spark documentation.
## Import custom Python modules
You can package custom Python modules as a zip file and import them into your notebook. This is useful for reusing shared utility functions across notebooks and job submissions.
### Create and upload a module
1. On your local machine, create a directory for your module:
```shell theme={"system"}
mkdir zipmoduletest
```
2. Create a Python file with your module code. For example, create `zipmoduletest/hellosedona.py`:
```python theme={"system"}
def hello(input):
return 'hello ' + str(input)
```
3. Add an empty `__init__.py` file to make the directory a valid Python package:
```shell theme={"system"}
touch zipmoduletest/__init__.py
```
4. Verify the directory structure:
```shell theme={"system"}
ls zipmoduletest
```
The output should show:
```
__init__.py hellosedona.py
```
5. Zip the module files:
```shell theme={"system"}
cd zipmoduletest && zip -r9 ../zipmoduletest.zip *
```
6. Upload `zipmoduletest.zip` to Wherobots Managed Storage or your integrated Amazon S3 bucket. For more information, see [Notebook and Data Storage](../storage-management/storage).
### Use the module in a notebook
After uploading, add the zip file to the Spark context and import your module:
```python theme={"system"}
# Add the zip file to the Spark context
sedona.sparkContext.addPyFile('s3:///path-to-file/zipmoduletest.zip')
# Import and use the custom module
from zipmoduletest.hellosedona import hello
result = hello("Sedona")
print(result)
```
Output:
```
hello Sedona
```
You can also use `addPyFile` to import custom Python modules in job submissions, not just notebooks.
## Access data from Amazon S3
For information on reading and writing data from an integrated Amazon S3 bucket, see [Access Integrated Storage in a Notebook](../storage-management/s3-storage-integration#access-integrated-storage-in-a-notebook).
To use new storage integrations or catalogs in your notebooks, you must start a new runtime. Notebooks can only access storage integrations or catalogs that were created before the runtime started.
## Open a notebook by path
To open a specific notebook file, do the following:
1. Click **File > Open from path**.
2. Enter the notebook path.
3. Click **Open**.
## Export notebooks
You can export notebooks as executable scripts for use with [WherobotsRunOperator](../run-operator) job submissions.
### Export a Python notebook
To export a Python notebook as an executable script, do the following:
1. Click **File** in the JupyterLab toolbar.
2. Hover over **Save and Export Notebook As...**
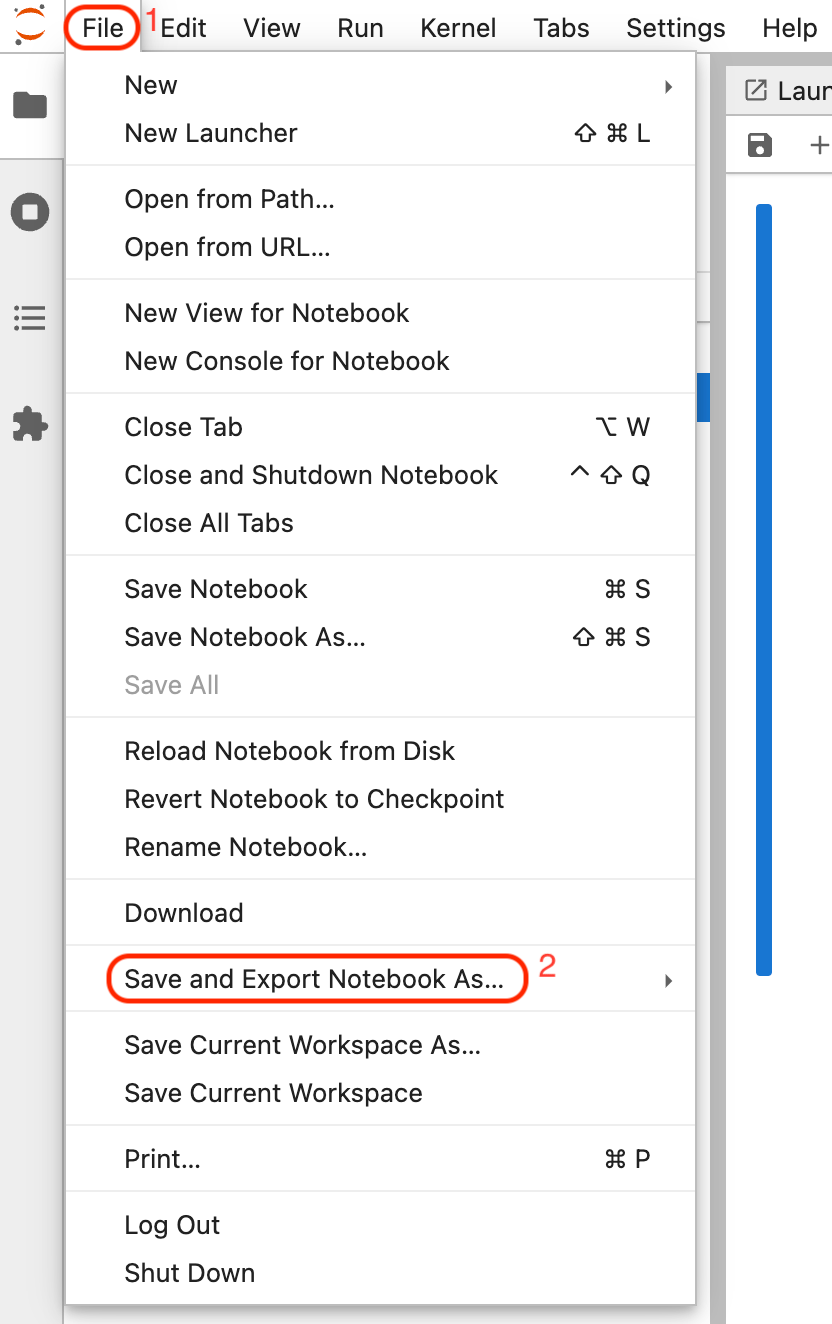 3. Select **Executable Script**.
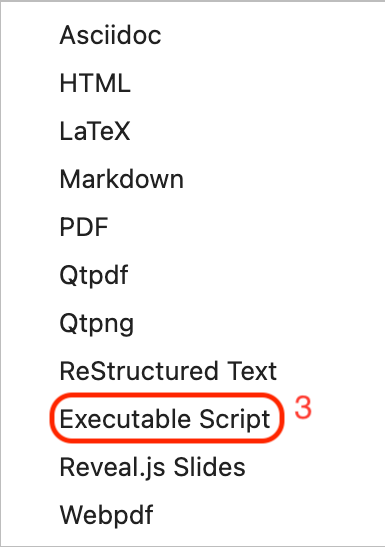 The `.py` file will download to your machine.
### Export a Scala notebook
To export a Scala notebook as an executable script, do the following:
1. Click **File** in the JupyterLab toolbar.
2. Hover over **Save and Export Notebook As...**
3. Select **Executable Script**.
The `.scala` file will download to your machine.
The exported Scala file does not include a `main` class. To make it runnable, wrap your code (excluding `import` statements) in an `App` object:
```scala theme={"system"}
object MyApp extends App {
// Your exported code here (excluding import statements)
}
```
You cannot execute `.scala` files in a Python kernel. Use the Scala kernel to run Scala code.
You can import the Scala executable file into `sedona-maven-example/src/main/scala/com/wherobots/sedona/` for job submission.
### Build a JAR file from a Scala notebook
To package your Scala notebook as a JAR file for job submission, do the following:
1. Click **File > New Launcher** in JupyterLab.
The `.py` file will download to your machine.
### Export a Scala notebook
To export a Scala notebook as an executable script, do the following:
1. Click **File** in the JupyterLab toolbar.
2. Hover over **Save and Export Notebook As...**
3. Select **Executable Script**.
The `.scala` file will download to your machine.
The exported Scala file does not include a `main` class. To make it runnable, wrap your code (excluding `import` statements) in an `App` object:
```scala theme={"system"}
object MyApp extends App {
// Your exported code here (excluding import statements)
}
```
You cannot execute `.scala` files in a Python kernel. Use the Scala kernel to run Scala code.
You can import the Scala executable file into `sedona-maven-example/src/main/scala/com/wherobots/sedona/` for job submission.
### Build a JAR file from a Scala notebook
To package your Scala notebook as a JAR file for job submission, do the following:
1. Click **File > New Launcher** in JupyterLab.
 2. Open **Terminal**.
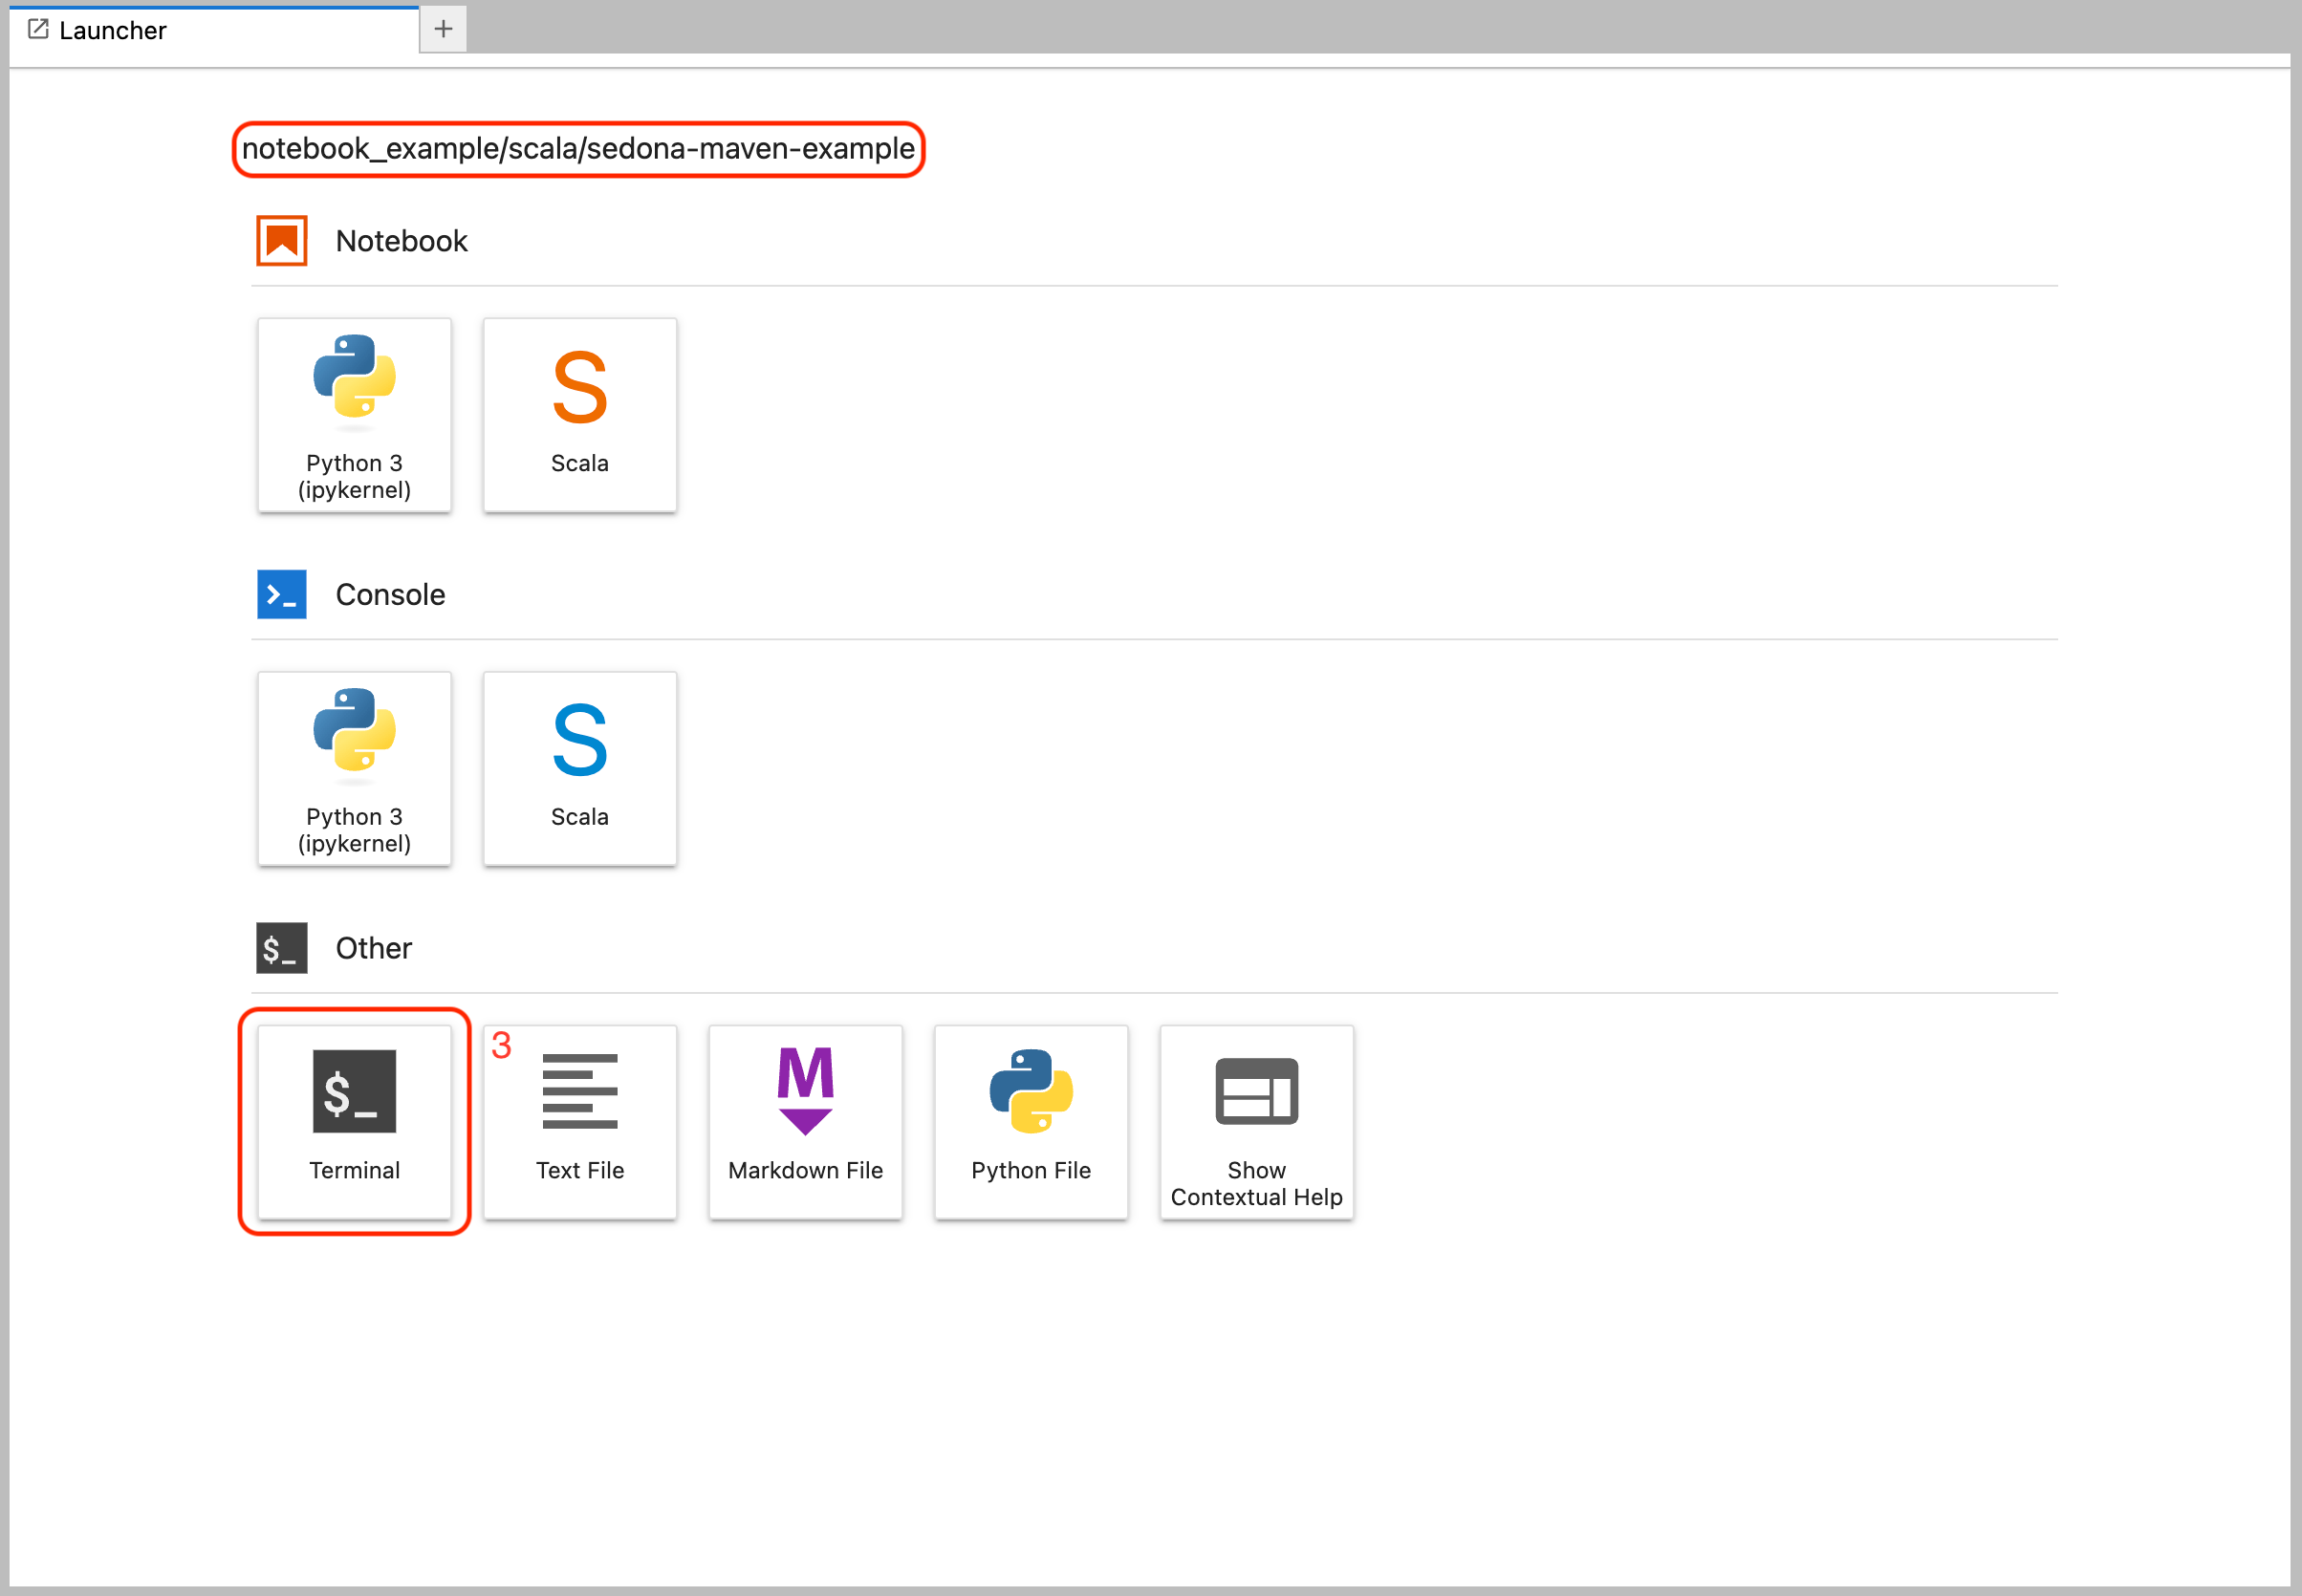 3. Navigate to the `sedona-maven-example` directory and build the project:
```shell theme={"system"}
cd sedona-maven-example
mvn clean package
```
4. In the JupyterLab file browser, locate the `target` folder.
3. Navigate to the `sedona-maven-example` directory and build the project:
```shell theme={"system"}
cd sedona-maven-example
mvn clean package
```
4. In the JupyterLab file browser, locate the `target` folder.
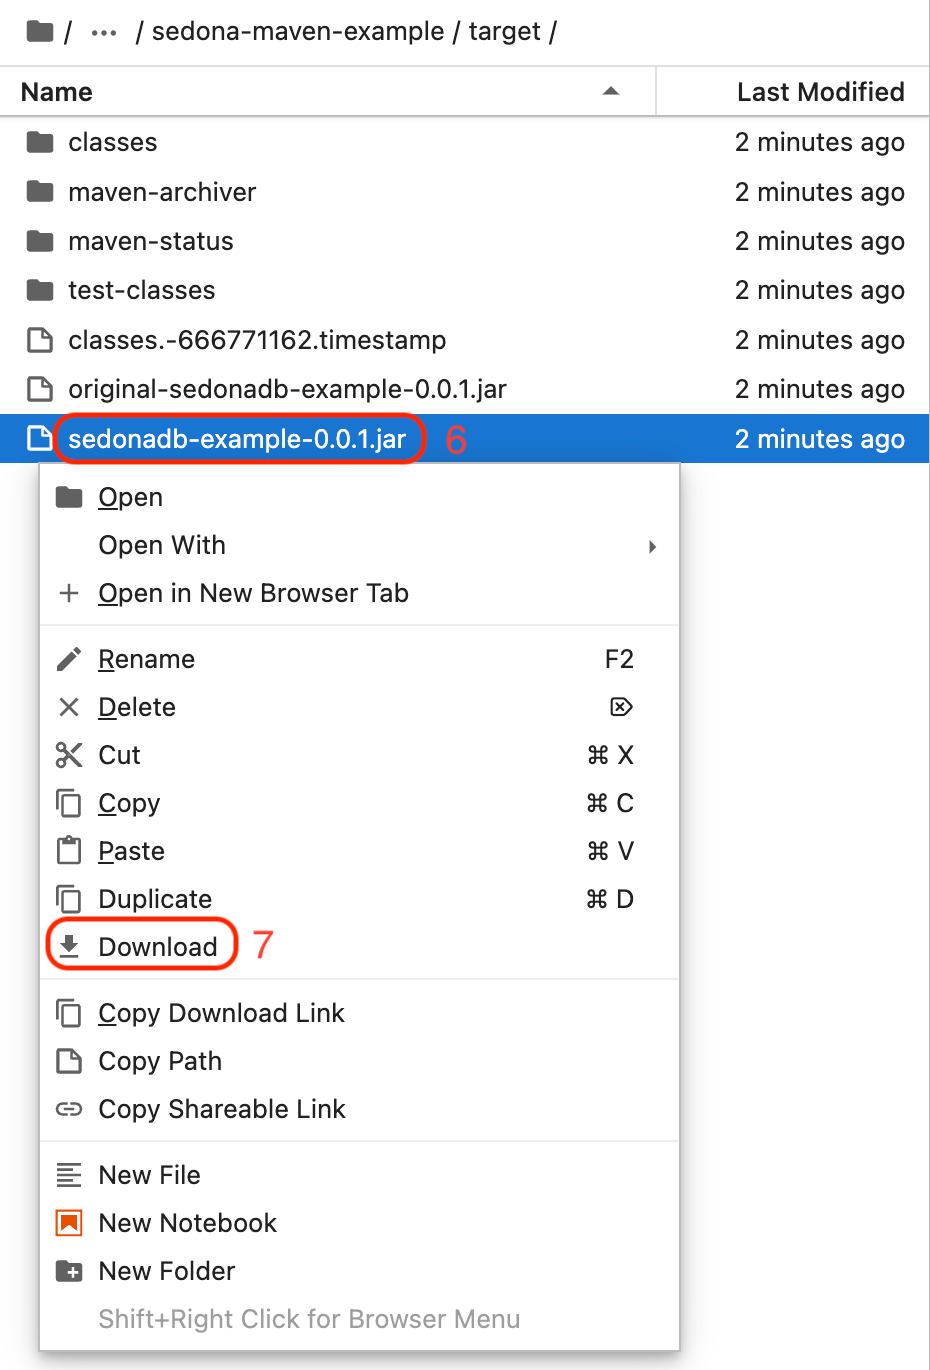
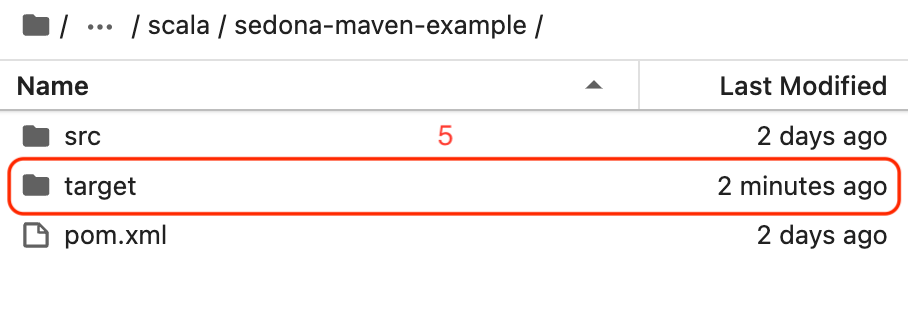 5. Right-click `sedonadb-example-0.0.1.jar` and select **Download**.
 You can add custom dependencies to the `pom.xml` file located at `notebook-example/scala/sedona-maven-example`.
Once you have the JAR file, refer to [WherobotsRunOperator](../run-operator) to create a job.
## Session expiration
A warning about a lost server connection may appear after extended use. Wherobots uses cookies for authentication that expire after one hour for security. Refresh the page to be redirected to the login screen. After logging back in, you will return to your previous page.
You can add custom dependencies to the `pom.xml` file located at `notebook-example/scala/sedona-maven-example`.
Once you have the JAR file, refer to [WherobotsRunOperator](../run-operator) to create a job.
## Session expiration
A warning about a lost server connection may appear after extended use. Wherobots uses cookies for authentication that expire after one hour for security. Refresh the page to be redirected to the login screen. After logging back in, you will return to your previous page.