> ## Documentation Index
> Fetch the complete documentation index at: https://docs.wherobots.com/llms.txt
> Use this file to discover all available pages before exploring further.
# Set Up Wherobots in Cursor
> Install the Wherobots VS Code Extension in Cursor and manually configure the MCP Server and Agent Skills for AI-assisted geospatial development.
Public Preview
[**Cursor**](https://cursor.com/product) by Anysphere is a Code OSS-based editor with built-in AI features.
The Wherobots extension installs from the Open VSX Registry, but the MCP Server and Agent Skills must be configured manually.
Cursor uses its own `mcp.json` schema (`mcpServers`, not `servers`), so follow the Cursor-specific steps below to install the MCP Server and Agent Skills.
## Component Overview
Wherobots' Agentic Tools consist of the following components that work together to provide our agentic experience:
Connects your AI assistant to Wherobots Cloud for catalog exploration, Spatial SQL generation, and query execution.
Gives your AI assistant domain-specific Wherobots knowledge for more accurate commands and fewer errors.
Wraps the full Wherobots API into a single binary for job submission, log streaming, and automation.
## Why use Wherobots' agentic tools?
Wherobots' agentic tools connect your AI assistant to Wherobots Cloud and your local development environment so you can interact with your spatial data, catalogs, and jobs in a more intuitive way.
The MCP Server connects your AI assistant to Wherobots Cloud so you can browse catalogs, databases, and table schemas (including Overture Maps and your own datasets) by asking questions in plain language instead of navigating the console.
Describe a geospatial task (e.g. "find buildings within 500m of this point") and the MCP Server returns optimized Spatial SQL using WherobotsDB's ST functions, spatial joins, and indexing patterns.
Use the CLI or the extension to submit Spark job runs, stream logs in real time, check resource metrics, and cancel jobs without leaving your editor or terminal.
Agent Skills teach your AI assistant Wherobots-specific APIs, query patterns, and workflow sequences so it produces correct `wherobots` CLI commands, valid MCP tool calls, and accurate notebook code on the first try.
## Before you start
The following prerequisites are required:
* [Cursor](https://www.cursor.com/) installed.
* A **Wherobots Account** within a Community, Professional, Innovation, or Enterprise Organization. See [Create a Wherobots Account](/get-started/wherobots-cloud/create-account).
**Organization Availability:** Available to all Wherobots Organization Editions.
* **Community Edition Organizations** can create and run local notebooks against the [Tiny and Micro runtimes](/develop/runtimes).
* **Professional, Innovation, or Enterprise Organizations** are required for job submission, the Wherobots MCP server, and additional compute tiers. For more information, see [Upgrade Organization](/get-started/upgrade-organization) or [Organization Editions](/get-started/organization-management/organization-editions).
* [Node.js](https://nodejs.org/) and [npm](https://www.npmjs.com/) installed on your system (required for installing Agent Skills via `npx`).
## Install the extension
Run the following command in your terminal:
```bash theme={"system"}
cursor --install-extension Wherobots.wherobotsjobsubmit
```
Or install from the [Open VSX Registry](https://open-vsx.org/extension/Wherobots/wherobotsjobsubmit).
The Wherobots extension depends on the Jupyter extension from `ms-toolsai`. If Cursor prompts that it cannot activate the extension because of a missing Jupyter dependency, click **Install and Reload**.
 ### Configure the extension
After installation, set your API key to connect to Wherobots Cloud.
These steps apply to VS Code, Cursor, Windsurf, [Kiro](https://kiro.dev/), Positron, Antigravity, Trae, VS Codium, and other Code OSS editors. All use the same Command Palette and extension settings.
To open the **Command Palette**, click the search bar at the top of your editor and type `>wherobots:`.
### Configure the extension
After installation, set your API key to connect to Wherobots Cloud.
These steps apply to VS Code, Cursor, Windsurf, [Kiro](https://kiro.dev/), Positron, Antigravity, Trae, VS Codium, and other Code OSS editors. All use the same Command Palette and extension settings.
To open the **Command Palette**, click the search bar at the top of your editor and type `>wherobots:`.
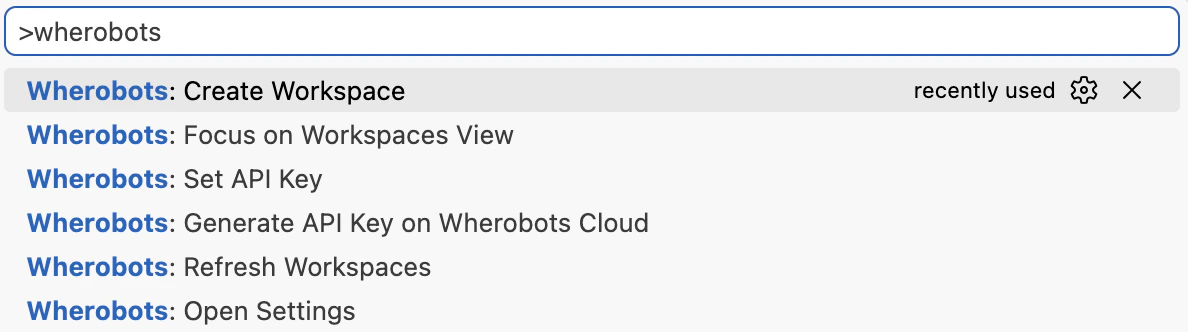 You can also press ⌘ + Shift + P on Mac, Ctrl + Shift + P on Windows/Linux.
1. If you don’t have an API key yet, click `Wherobots: Generate API Key on Wherobots Cloud` to create one.
2. Click `Wherobots: Set API Key` and enter your existing or newly created [Wherobots API key](/get-started/wherobots-cloud/api-keys/) when prompted, then press Enter.
API keys are stored securely in your editor's Secret Storage.
### Verify the installation
To confirm the extension is installed and configured correctly:
To open the **Command Palette**, click the search bar at the top of your editor and type `>wherobots:`.
You can also press ⌘ + Shift + P on Mac, Ctrl + Shift + P on Windows/Linux.
Type **Wherobots** to see the available extension commands.
At this point, you should see commands including:
* `Wherobots: Set API Key`
* `Wherobots: Create Workspace`
* `Wherobots: Submit Job`
* `Wherobots: Refresh Workspaces`
* `Wherobots: Open Settings`
* `Wherobots: Install Jupyter Extension`
### Apply the extension to all profiles (optional)
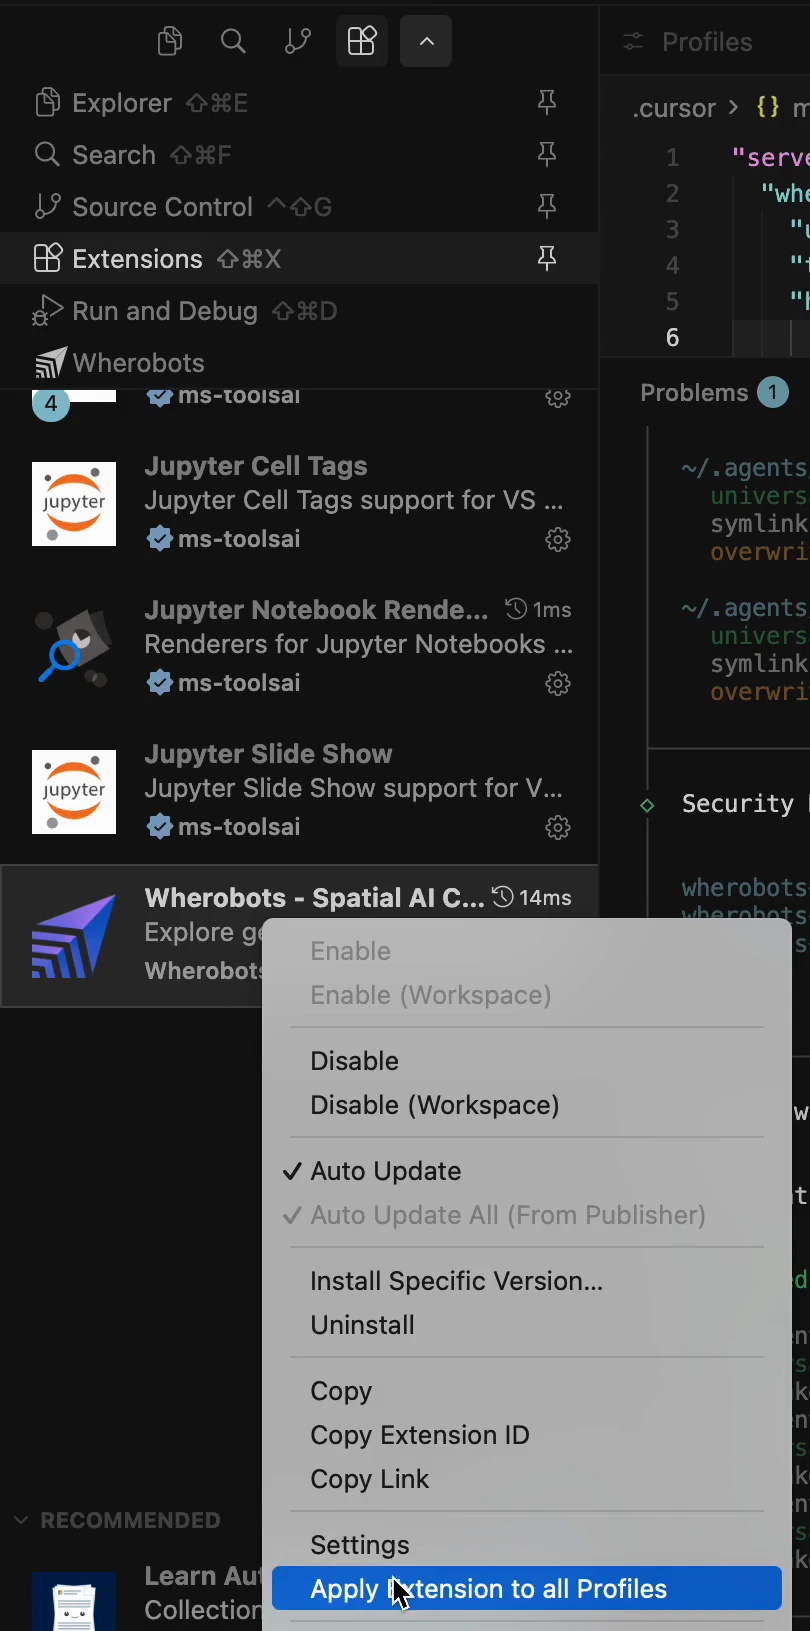
If you use multiple Cursor profiles, right-click the **Wherobots - Spatial AI Coding Assistant** entry in the Extensions view and select **Apply Extension to all Profiles** so the extension is available in every profile.
You can also press ⌘ + Shift + P on Mac, Ctrl + Shift + P on Windows/Linux.
1. If you don’t have an API key yet, click `Wherobots: Generate API Key on Wherobots Cloud` to create one.
2. Click `Wherobots: Set API Key` and enter your existing or newly created [Wherobots API key](/get-started/wherobots-cloud/api-keys/) when prompted, then press Enter.
API keys are stored securely in your editor's Secret Storage.
### Verify the installation
To confirm the extension is installed and configured correctly:
To open the **Command Palette**, click the search bar at the top of your editor and type `>wherobots:`.
You can also press ⌘ + Shift + P on Mac, Ctrl + Shift + P on Windows/Linux.
Type **Wherobots** to see the available extension commands.
At this point, you should see commands including:
* `Wherobots: Set API Key`
* `Wherobots: Create Workspace`
* `Wherobots: Submit Job`
* `Wherobots: Refresh Workspaces`
* `Wherobots: Open Settings`
* `Wherobots: Install Jupyter Extension`
### Apply the extension to all profiles (optional)
If you use multiple Cursor profiles, right-click the **Wherobots - Spatial AI Coding Assistant** entry in the Extensions view and select **Apply Extension to all Profiles** so the extension is available in every profile.
 ## Configure the MCP Server
The [Wherobots MCP Server](/develop/mcp/mcp-server-overview) enables AI assistants to explore your spatial data catalogs, generate Spatial SQL, and execute queries. Cursor expects a project-level `.cursor/mcp.json` file with an `mcpServers` object.
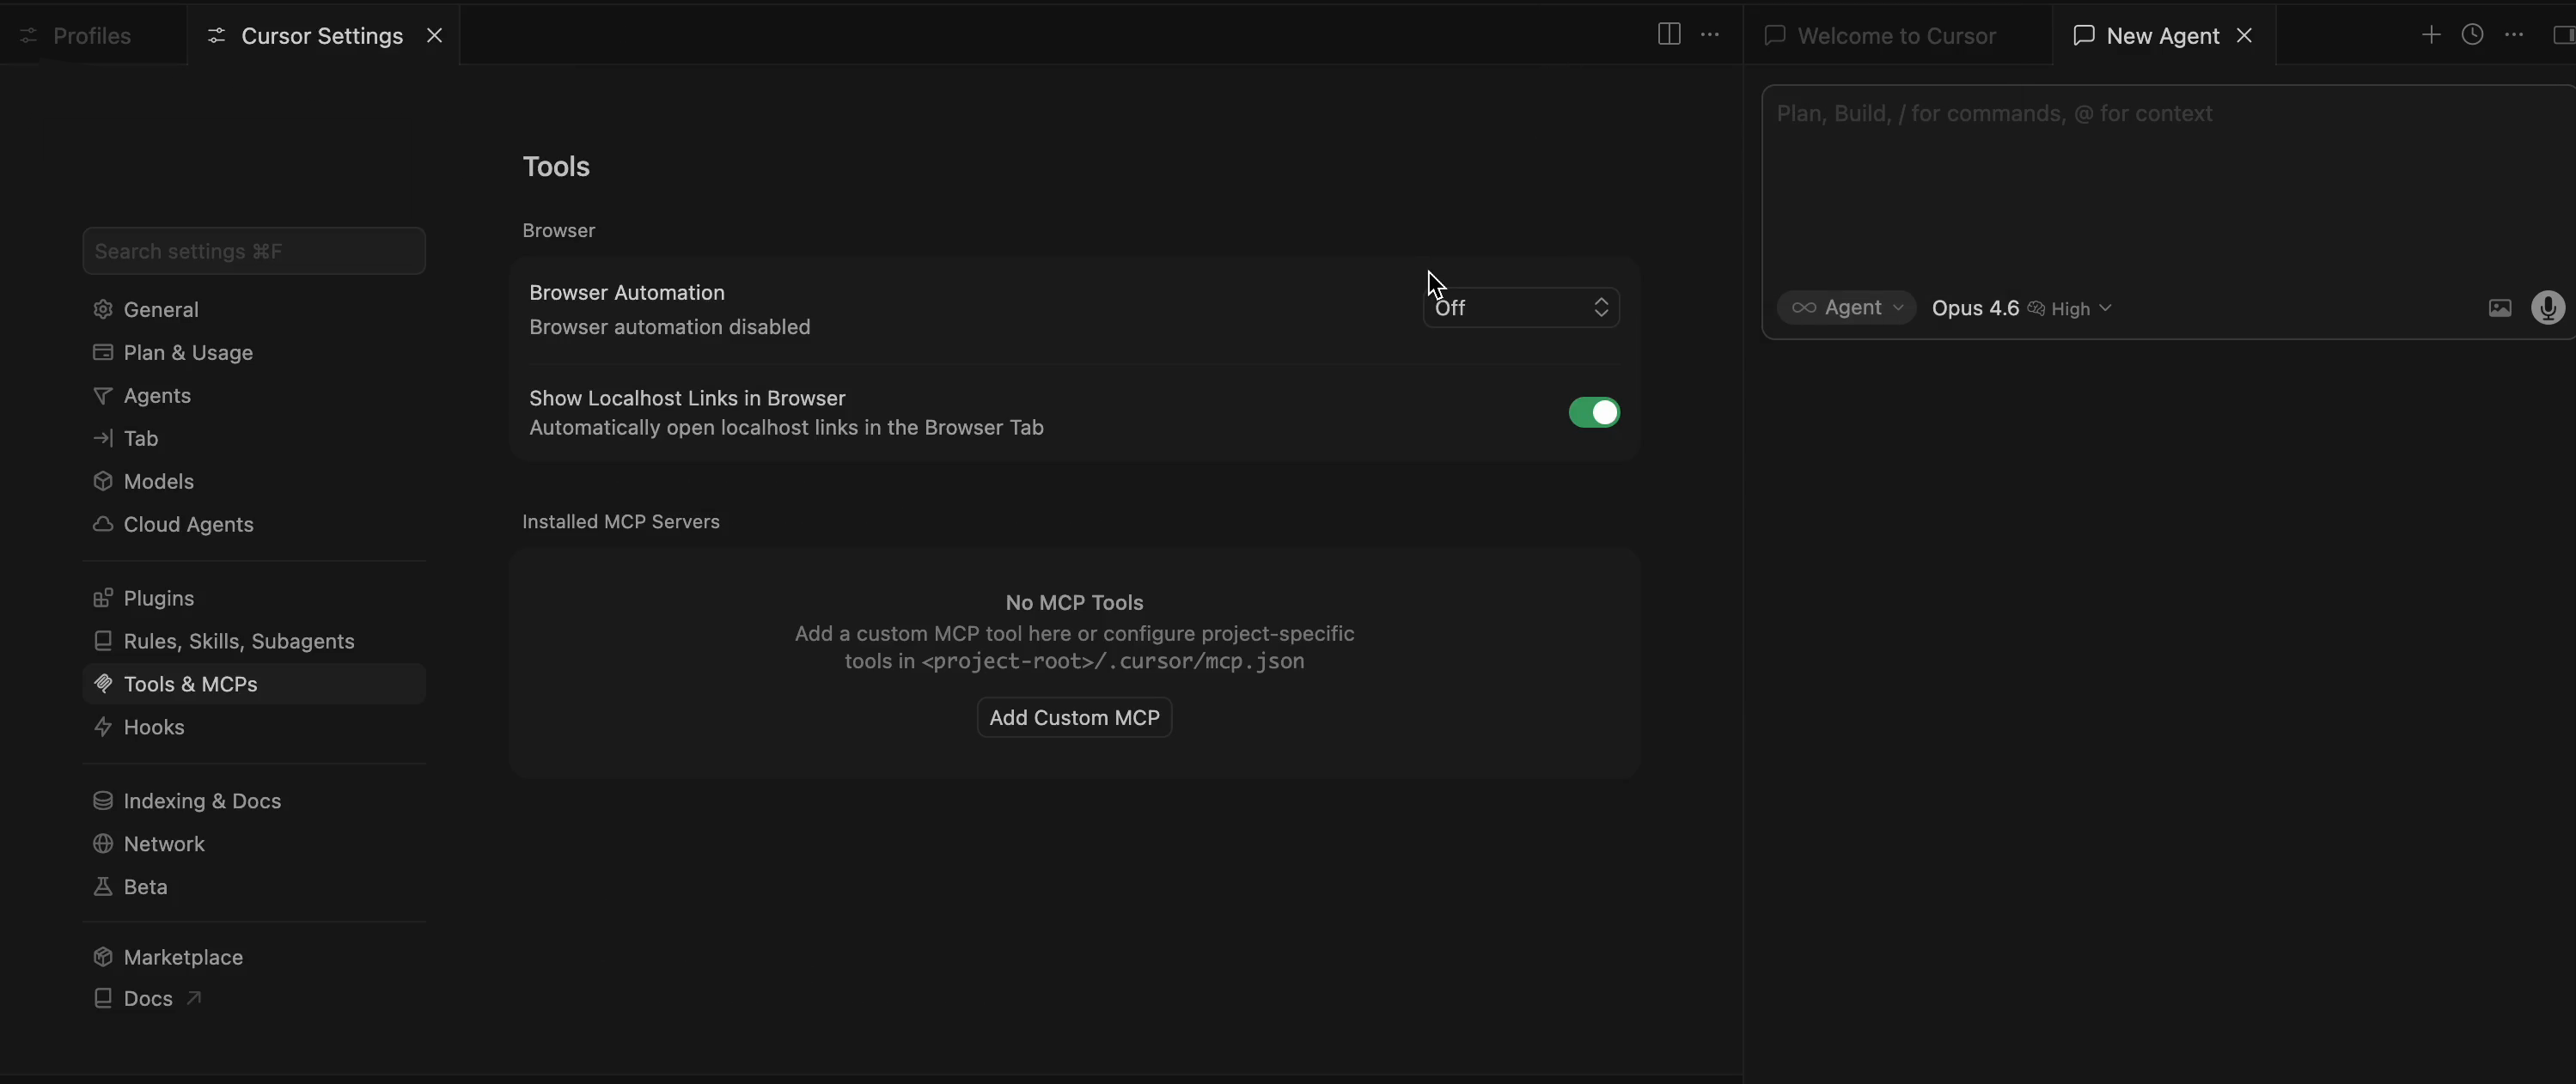
Open the **Command Palette** (⌘ + Shift + P on macOS, Ctrl + Shift + P on Windows/Linux), type **Cursor Settings: Tools & MCPs**, and press Enter.
Under **Installed MCP Servers**, click **Add Custom MCP**. Cursor opens (or creates) `.cursor/mcp.json` in your project root.
## Configure the MCP Server
The [Wherobots MCP Server](/develop/mcp/mcp-server-overview) enables AI assistants to explore your spatial data catalogs, generate Spatial SQL, and execute queries. Cursor expects a project-level `.cursor/mcp.json` file with an `mcpServers` object.
Open the **Command Palette** (⌘ + Shift + P on macOS, Ctrl + Shift + P on Windows/Linux), type **Cursor Settings: Tools & MCPs**, and press Enter.
Under **Installed MCP Servers**, click **Add Custom MCP**. Cursor opens (or creates) `.cursor/mcp.json` in your project root.
 Paste the following into `.cursor/mcp.json`, then save the file:
```json theme={"system"}
{
"mcpServers": {
"wherobots-mcp-server": {
"url": "https://api.cloud.wherobots.com/mcp/"
}
}
}
```
When you first use the MCP server, Cursor initiates an OAuth flow — a browser window opens for you to sign in to Wherobots and select your organization.
Add a `headers` object with your [Wherobots API key](/get-started/wherobots-cloud/api-keys/):
```json theme={"system"}
{
"mcpServers": {
"wherobots-mcp-server": {
"url": "https://api.cloud.wherobots.com/mcp/",
"headers": {
"x-api-key": ""
}
}
}
}
```
Cursor requires the top-level key `mcpServers` (plural, camel-case) and **does not** accept the VS Code–style `servers` key or the `"type": "http"` field. If the file has either, Cursor will show *"Invalid config: mcpServers must be an object"* in Settings.
Paste the following into `.cursor/mcp.json`, then save the file:
```json theme={"system"}
{
"mcpServers": {
"wherobots-mcp-server": {
"url": "https://api.cloud.wherobots.com/mcp/"
}
}
}
```
When you first use the MCP server, Cursor initiates an OAuth flow — a browser window opens for you to sign in to Wherobots and select your organization.
Add a `headers` object with your [Wherobots API key](/get-started/wherobots-cloud/api-keys/):
```json theme={"system"}
{
"mcpServers": {
"wherobots-mcp-server": {
"url": "https://api.cloud.wherobots.com/mcp/",
"headers": {
"x-api-key": ""
}
}
}
}
```
Cursor requires the top-level key `mcpServers` (plural, camel-case) and **does not** accept the VS Code–style `servers` key or the `"type": "http"` field. If the file has either, Cursor will show *"Invalid config: mcpServers must be an object"* in Settings.
 1. Open the **Command Palette** and select **Developer: Reload Window**.
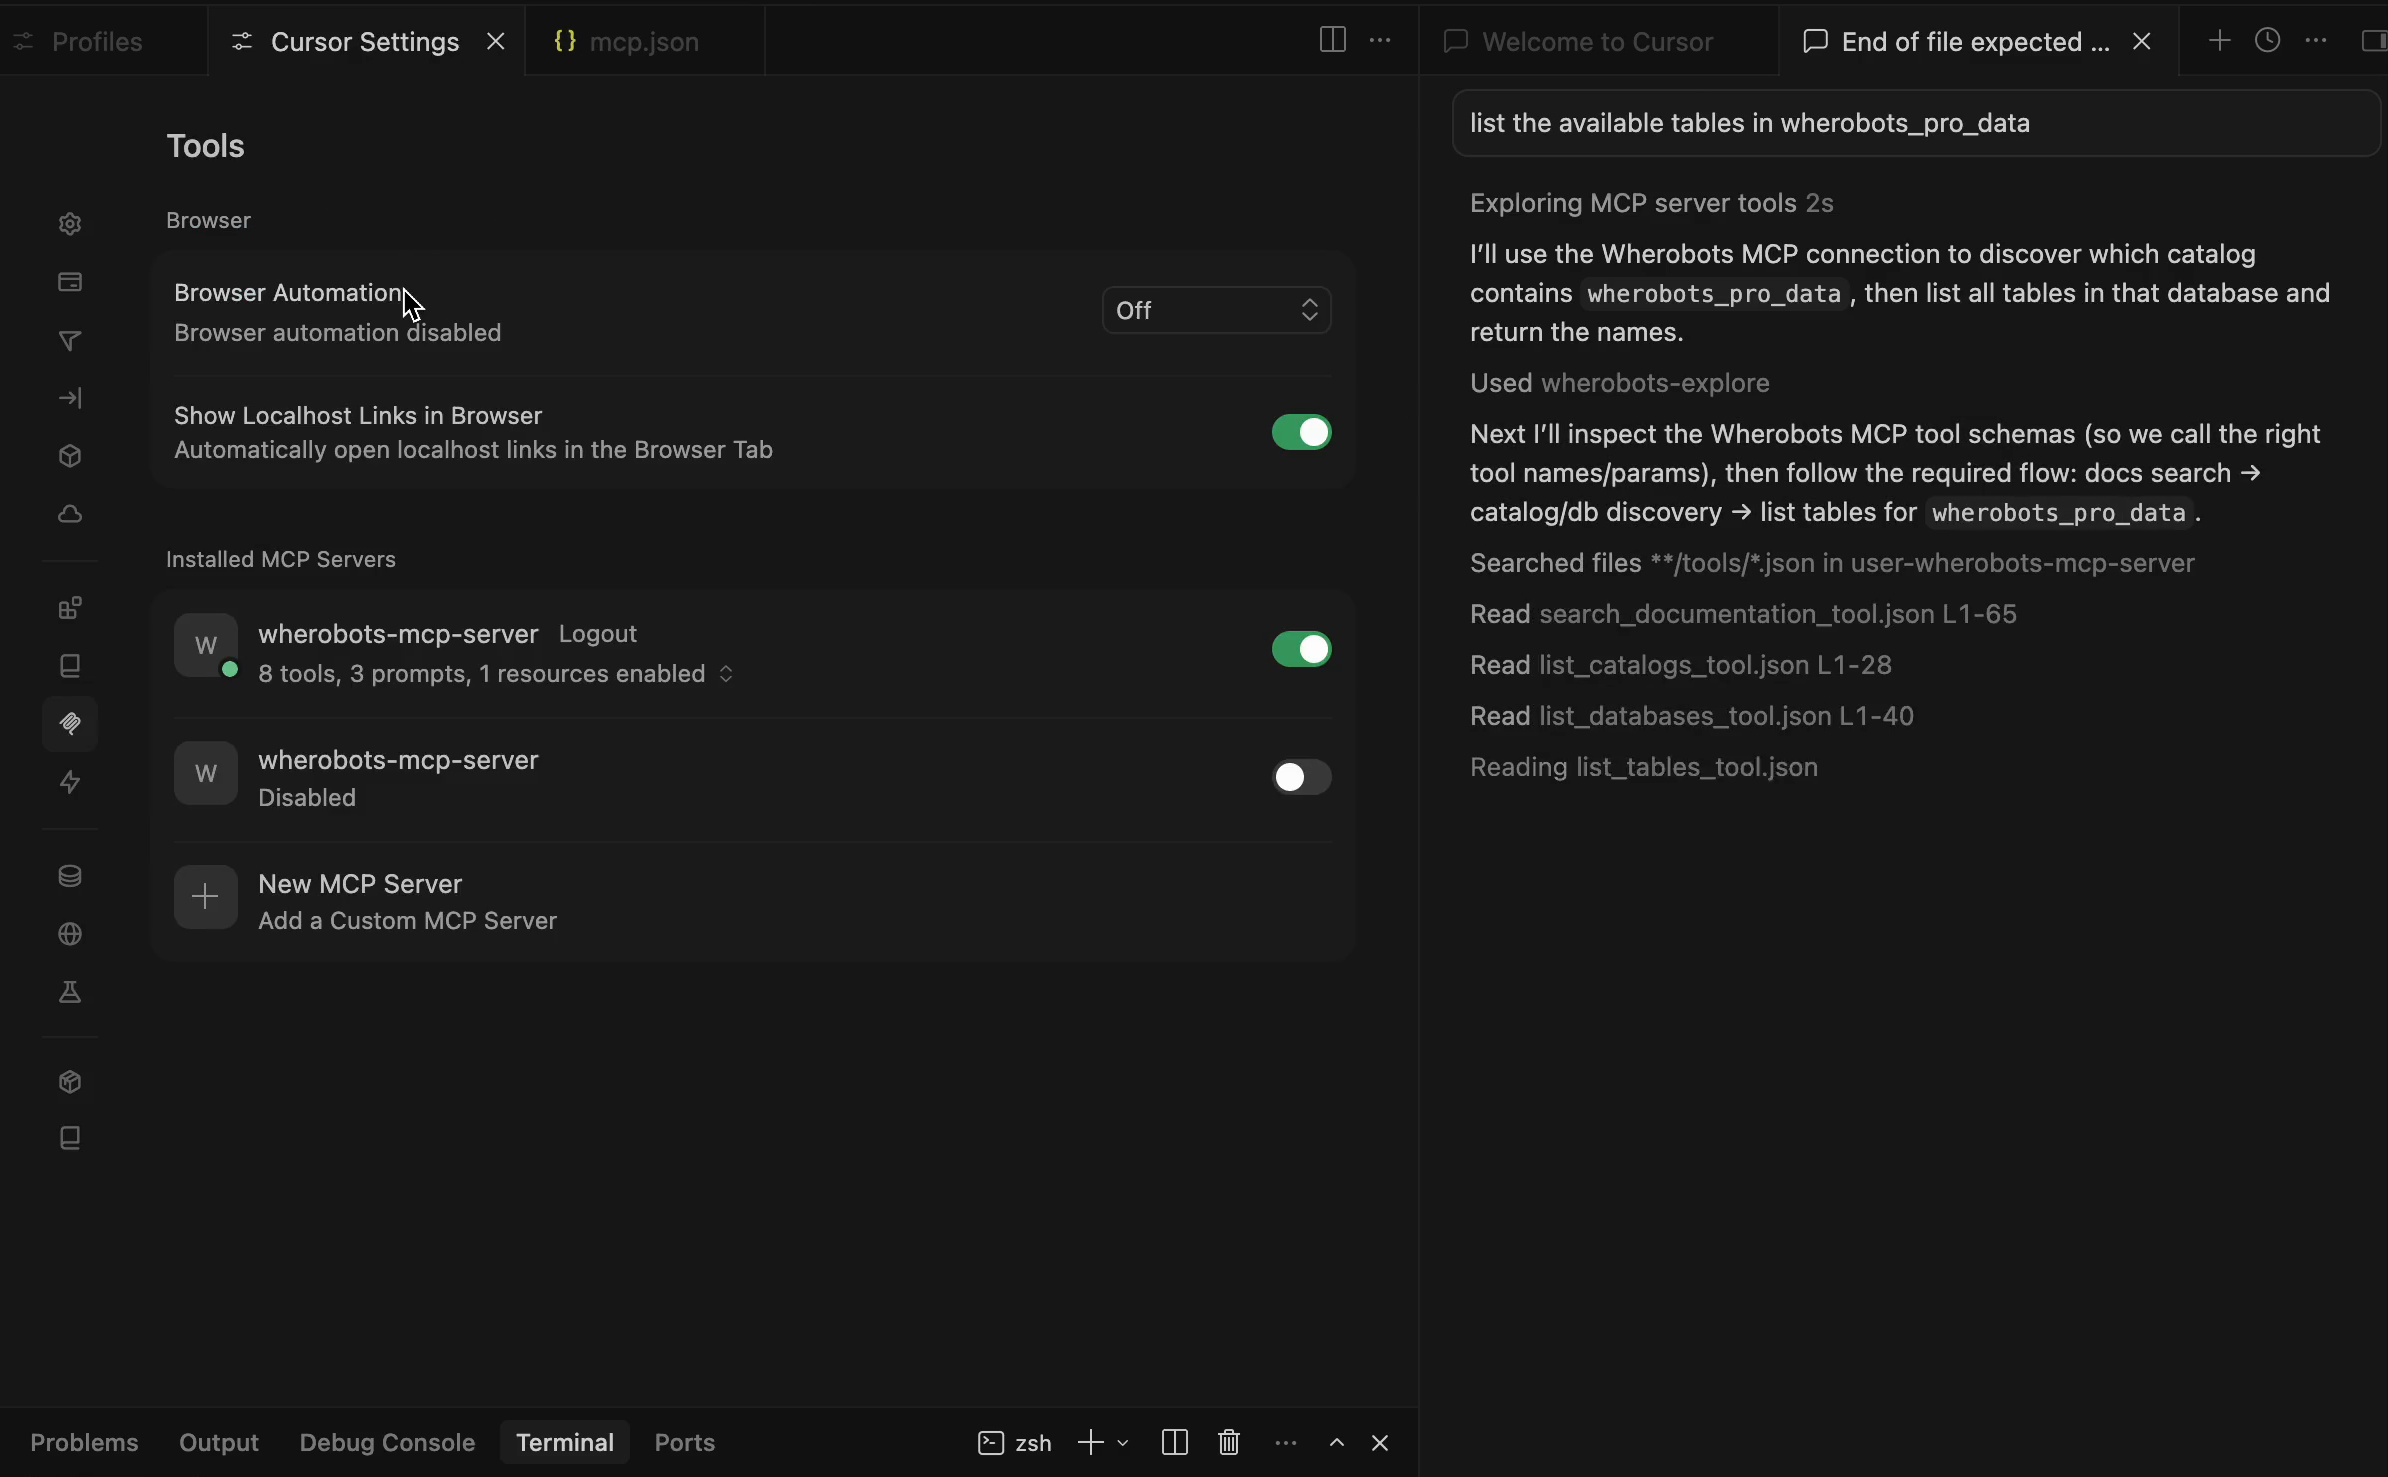
2. Return to **Cursor Settings > Tools & MCPs** and confirm that `wherobots-mcp-server` is listed, has a green status dot, and lists its tools (for example, `list_catalogs_tool`, `list_tables_tool`, `describe_table_tool`, `execute_query_tool`, `search_documentation_tool`) plus prompts and a `get_version` resource.
1. Open the **Command Palette** and select **Developer: Reload Window**.
2. Return to **Cursor Settings > Tools & MCPs** and confirm that `wherobots-mcp-server` is listed, has a green status dot, and lists its tools (for example, `list_catalogs_tool`, `list_tables_tool`, `describe_table_tool`, `execute_query_tool`, `search_documentation_tool`) plus prompts and a `get_version` resource.
 The extension exposes optional settings for the MCP server — including query timeout, runtime size, and cloud region. See [Extension Settings](/develop/vscode-extension/settings).
## Install Agent Skills
[Agent Skills](/develop/agent-skills) give your AI assistant domain-specific knowledge about Wherobots workflows, APIs, and best practices. The Wherobots skill pack is distributed via the [skills CLI](https://skills.sh/).
From a terminal in your project root, run:
```bash theme={"system"}
npx skills add -g wherobots/agent-skills
```
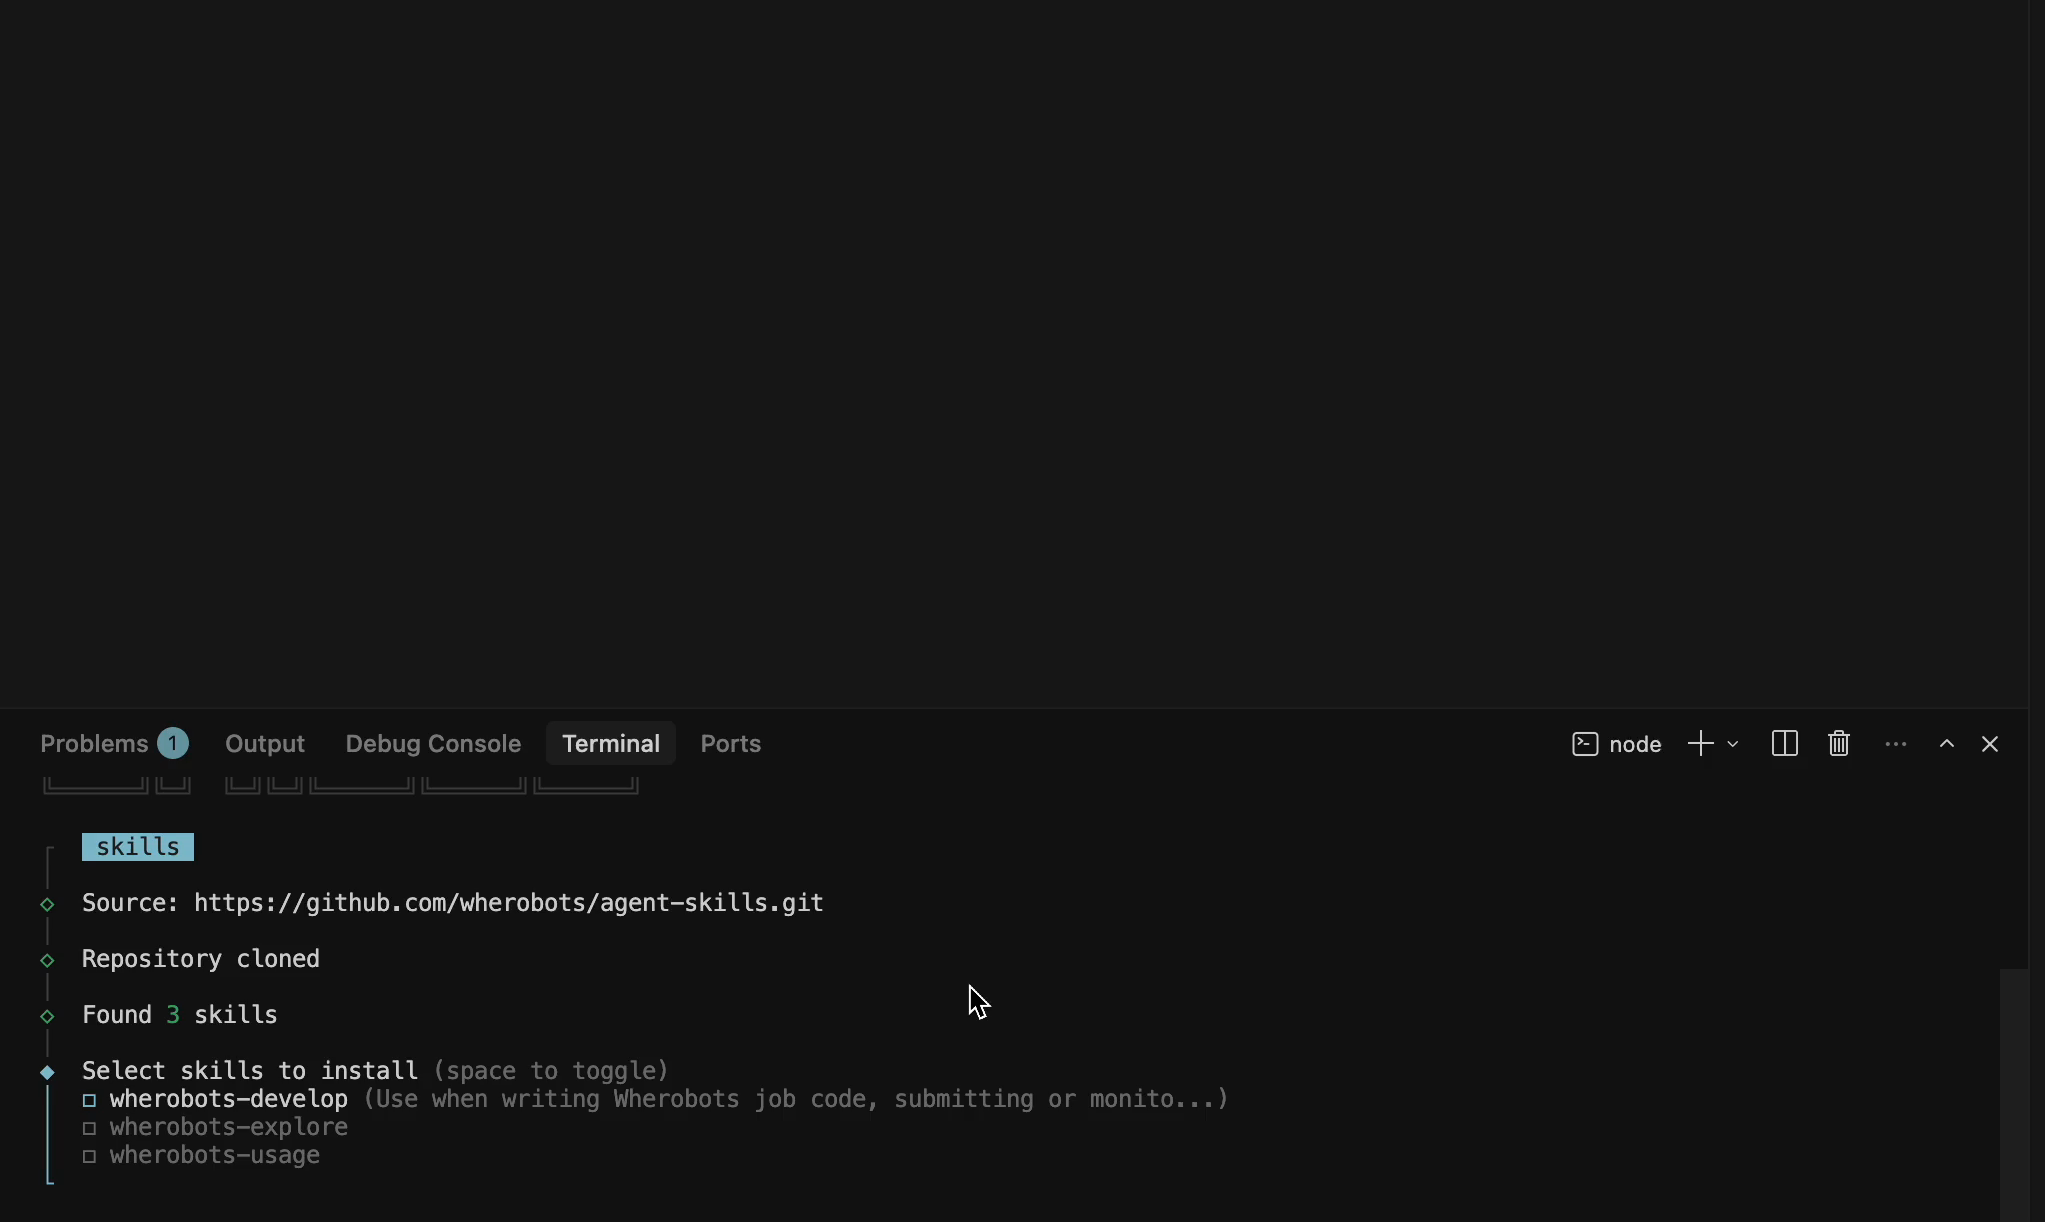
The installer clones the Wherobots skills repository and launches an interactive wizard.
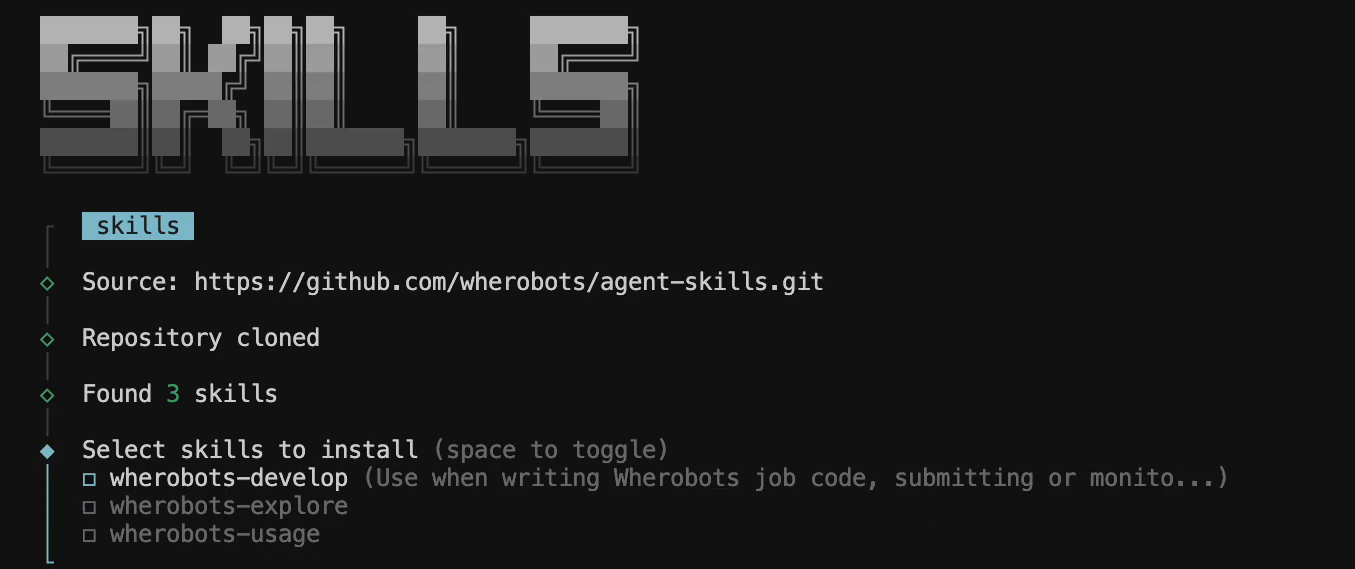
When prompted with **Select skills to install**, press Space to toggle each skill and Enter to confirm. Select all three:
* `wherobots-develop` — guidance for writing Wherobots jobs and using the SDK/CLI.
* `wherobots-explore` — catalog discovery and spatial query generation via the MCP server.
* `wherobots-usage` — interface decision matrix, auth setup, and scheduled-job patterns.
The extension exposes optional settings for the MCP server — including query timeout, runtime size, and cloud region. See [Extension Settings](/develop/vscode-extension/settings).
## Install Agent Skills
[Agent Skills](/develop/agent-skills) give your AI assistant domain-specific knowledge about Wherobots workflows, APIs, and best practices. The Wherobots skill pack is distributed via the [skills CLI](https://skills.sh/).
From a terminal in your project root, run:
```bash theme={"system"}
npx skills add -g wherobots/agent-skills
```
The installer clones the Wherobots skills repository and launches an interactive wizard.
When prompted with **Select skills to install**, press Space to toggle each skill and Enter to confirm. Select all three:
* `wherobots-develop` — guidance for writing Wherobots jobs and using the SDK/CLI.
* `wherobots-explore` — catalog discovery and spatial query generation via the MCP server.
* `wherobots-usage` — interface decision matrix, auth setup, and scheduled-job patterns.
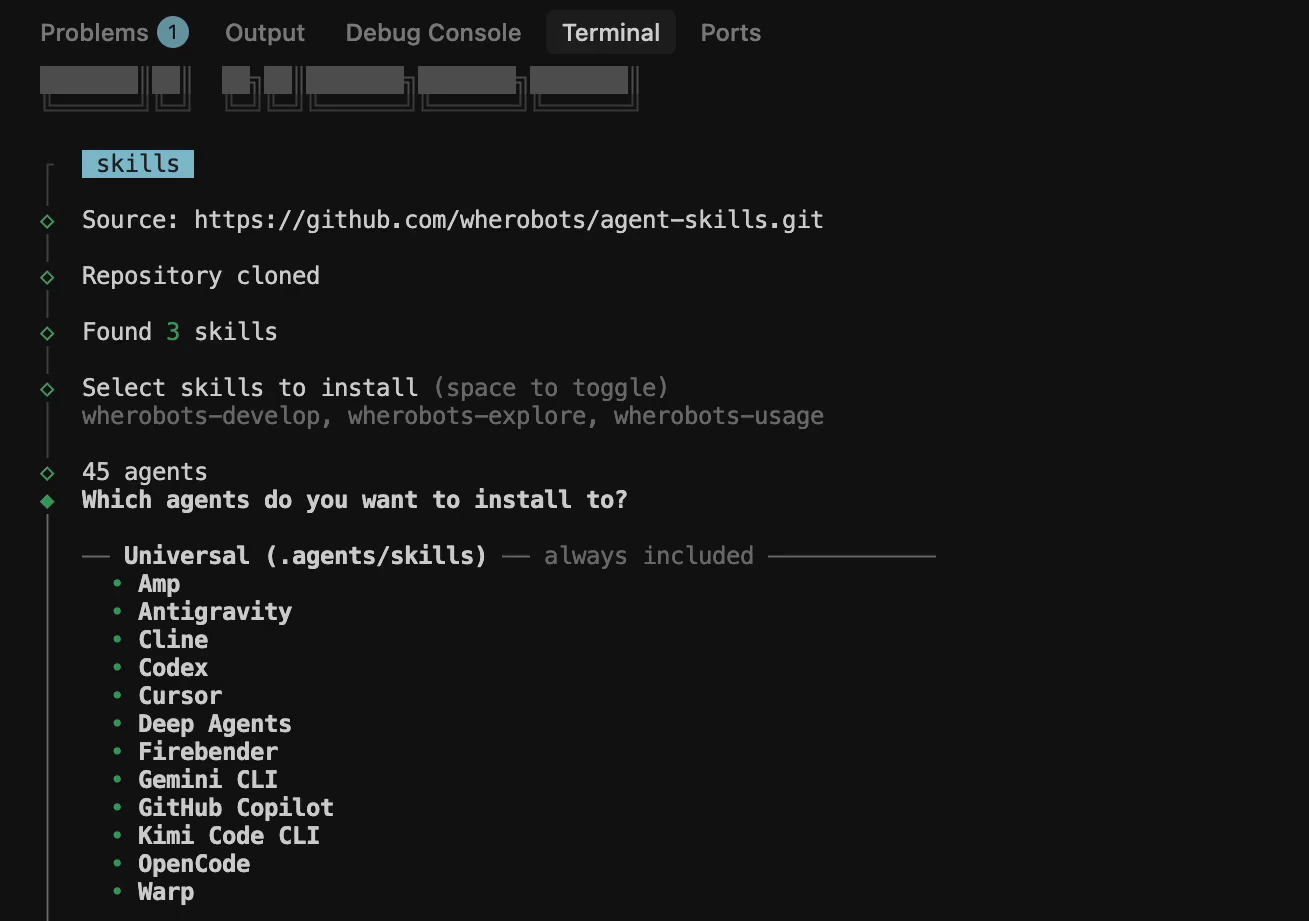 On the **Which agents do you want to install to?** screen, make sure **Cursor** is selected under **Universal** (it is included by default). You can optionally add other agents from the **Additional agents** list (for example, Claude Code at `~/.claude/skills`).
Press Enter to continue.
On the **Which agents do you want to install to?** screen, make sure **Cursor** is selected under **Universal** (it is included by default). You can optionally add other agents from the **Additional agents** list (for example, Claude Code at `~/.claude/skills`).
Press Enter to continue.
 The installer prints an installation summary and security risk assessments (Gen, Socket, Snyk). When prompted **Proceed with installation?**, type `Yes` and press Enter.
## Verify your setup
1. Open a **New Agent** chat in Cursor (the chat panel on the right).
2. Confirm **Agent** is selected as the chat mode.
3. Ask a test question, for example:
```text wrap theme={"system"}
List the catalogs in my Wherobots Data Hub
```
4. If everything is configured, Cursor's agent calls `search_documentation_tool`, `list_catalogs_tool`, `list_databases_tool`, and `list_tables_tool` on `wherobots-mcp-server` and returns the catalogs, databases, and tables in your Organization.
5. Re-open **Cursor Settings → Tools & MCPs** and confirm `wherobots-mcp-server` shows a green dot with all tools enabled.
## Pin the extension for easy access
If the Wherobots VS Code Extension is pinned to your sidebar, you can also create a new workspace by clicking the **Create Workspace** button.
The installer prints an installation summary and security risk assessments (Gen, Socket, Snyk). When prompted **Proceed with installation?**, type `Yes` and press Enter.
## Verify your setup
1. Open a **New Agent** chat in Cursor (the chat panel on the right).
2. Confirm **Agent** is selected as the chat mode.
3. Ask a test question, for example:
```text wrap theme={"system"}
List the catalogs in my Wherobots Data Hub
```
4. If everything is configured, Cursor's agent calls `search_documentation_tool`, `list_catalogs_tool`, `list_databases_tool`, and `list_tables_tool` on `wherobots-mcp-server` and returns the catalogs, databases, and tables in your Organization.
5. Re-open **Cursor Settings → Tools & MCPs** and confirm `wherobots-mcp-server` shows a green dot with all tools enabled.
## Pin the extension for easy access
If the Wherobots VS Code Extension is pinned to your sidebar, you can also create a new workspace by clicking the **Create Workspace** button.
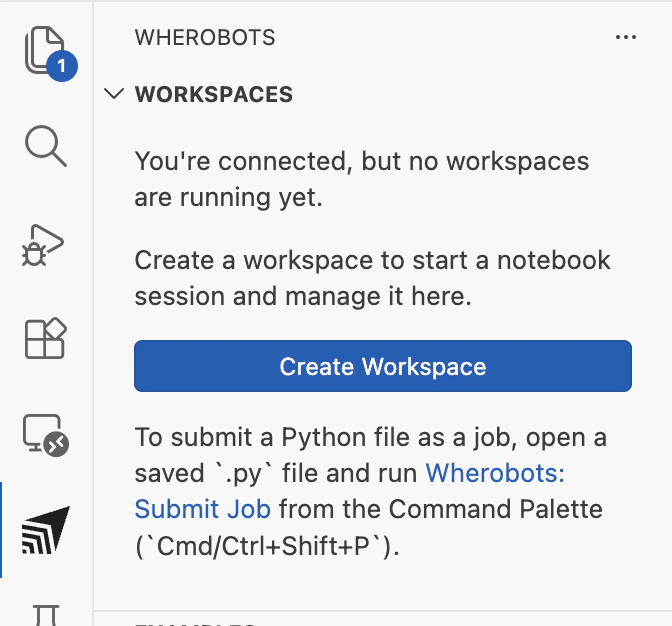 To pin the Wherobots extension to the sidebar:
Right-click the **Activity Bar** (the vertical icon bar on the left side of your editor).
A menu will appear showing all available extensions.
To pin the extension, find **Wherobots** in the list and click on it to ensure it's checked.
To pin the Wherobots extension to the sidebar:
Right-click the **Activity Bar** (the vertical icon bar on the left side of your editor).
A menu will appear showing all available extensions.
To pin the extension, find **Wherobots** in the list and click on it to ensure it's checked.
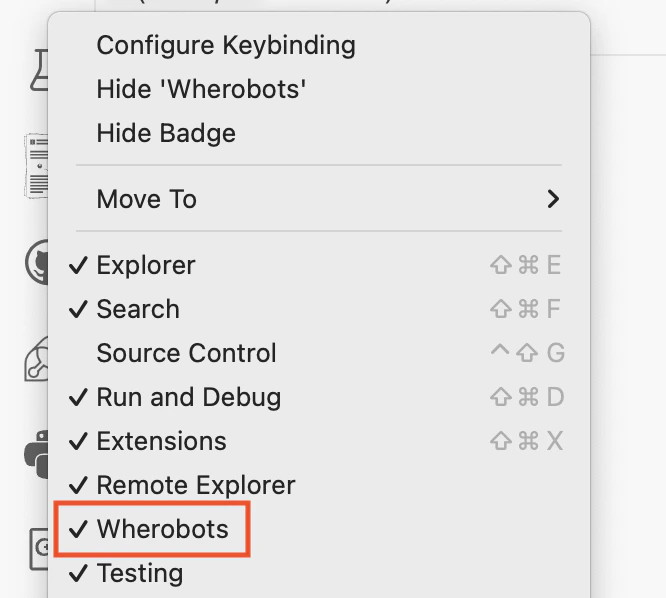 Now you'll have easy access to the extension in your editor's sidebar.
## Troubleshooting
### `Invalid config: mcpServers must be an object` or `JSON syntax error`
Cursor validates `.cursor/mcp.json` against its own schema and will display these errors in **Cursor Settings → Tools & MCPs** when the file is malformed.
Common causes:
* Missing the outer `{ ... }` wrapper around the config — the JSON parser fails with *"End of file expected."*
* Using the VS Code key `"servers"` instead of Cursor's `"mcpServers"`.
* Including a `"type": "http"` field — Cursor does not use it.
Re-paste the snippet from [Configure the MCP Server](#configure-the-mcp-server) exactly as shown, save the file, and reload the window.
## Next steps
Explore the following resources to get the most out of Wherobots in Cursor:
Browse catalogs, schemas, and tables in the Data Hub sidebar.
Create and connect local notebooks to remote Wherobots compute.
Submit Python scripts as Wherobots job runs from your editor.
Common tasks, example prompts, and cost considerations for the MCP Server.
Now you'll have easy access to the extension in your editor's sidebar.
## Troubleshooting
### `Invalid config: mcpServers must be an object` or `JSON syntax error`
Cursor validates `.cursor/mcp.json` against its own schema and will display these errors in **Cursor Settings → Tools & MCPs** when the file is malformed.
Common causes:
* Missing the outer `{ ... }` wrapper around the config — the JSON parser fails with *"End of file expected."*
* Using the VS Code key `"servers"` instead of Cursor's `"mcpServers"`.
* Including a `"type": "http"` field — Cursor does not use it.
Re-paste the snippet from [Configure the MCP Server](#configure-the-mcp-server) exactly as shown, save the file, and reload the window.
## Next steps
Explore the following resources to get the most out of Wherobots in Cursor:
Browse catalogs, schemas, and tables in the Data Hub sidebar.
Create and connect local notebooks to remote Wherobots compute.
Submit Python scripts as Wherobots job runs from your editor.
Common tasks, example prompts, and cost considerations for the MCP Server.